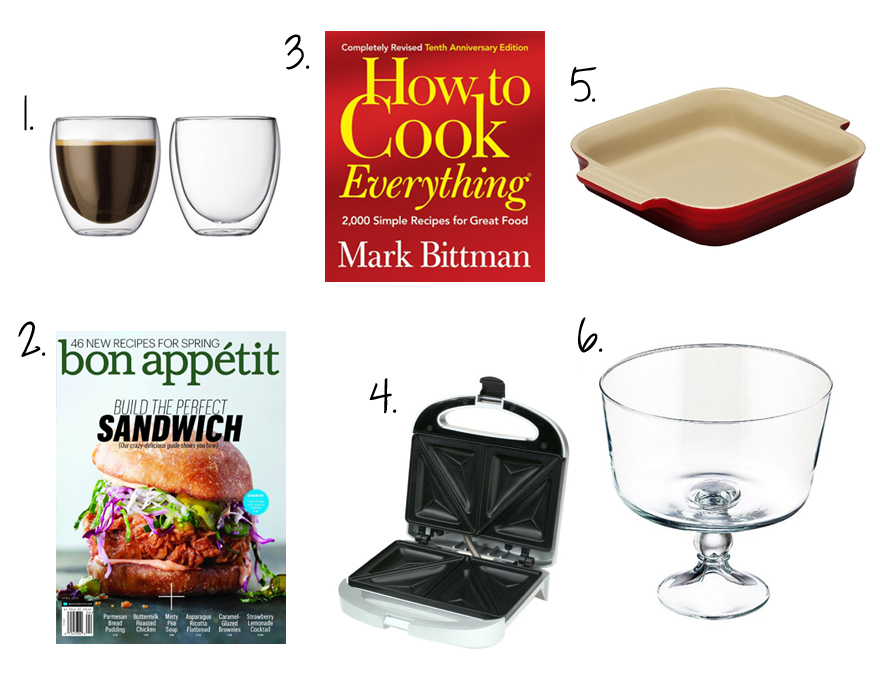
The big day is fast approaching and you need an impressive holiday gift for a foodie co-worker or new boyfriend/girlfriend who loves to cook. These items are sure to get the job done.
1. Bodum Double-wall Thermo Glasses: The super chic, light-weight cups are designed for cold and hot beverages alike. They are made with two thin layers of glass, which prevents condensation with cold drinks and allows you to hold the cup without a handle with hot beverages. The technology is genius and the cups can be used for everything from wine to coffee.
2. A Subscription to Bon Appetit: I’ve been reading this magazine religiously for years and can vouch for its top-notch quality. Written in a fresh, approachable voice, it’s the perfect mix of innovative yet doable recipes, restaurant news from the world over, cooking technique how-tos and absolutely stunning photography.
3. How to Cook Everything by Mark Bittman: 2,000+ easy recipes and ideas that allow you to spend less time in the kitchen and more time eating great homemade food. Written by a New York Times food writer, this is simply a great cookbook.
4. Cuisinart Sandwich Maker: This small appliance is easily one of my favorite possessions. It’s light, durable and small enough to fit even into a drawer. With its ridged design, it has the ability to turn any lackluster sandwich into a crusty portable pocket of cheesy goodness in minutes. And it is such a steal at only $19.95!
5. Le Creuset Stoneware: Le Creuset cookware is legendary and has been known to be passed down between generations. It’s beautiful, durable, and there’s no better presentation for mac & cheese, shepherd pie, or the infamous green bean casserole.
6. Trifle Bowl: A trifle is a festive dessert made of sponge cake, whipped cream and fruit (in one shape or another) layered together. This gift is perfect for the dessert challenged (like me) since it allows you to make dessert by throwing a few ingredients together and calling it a day.
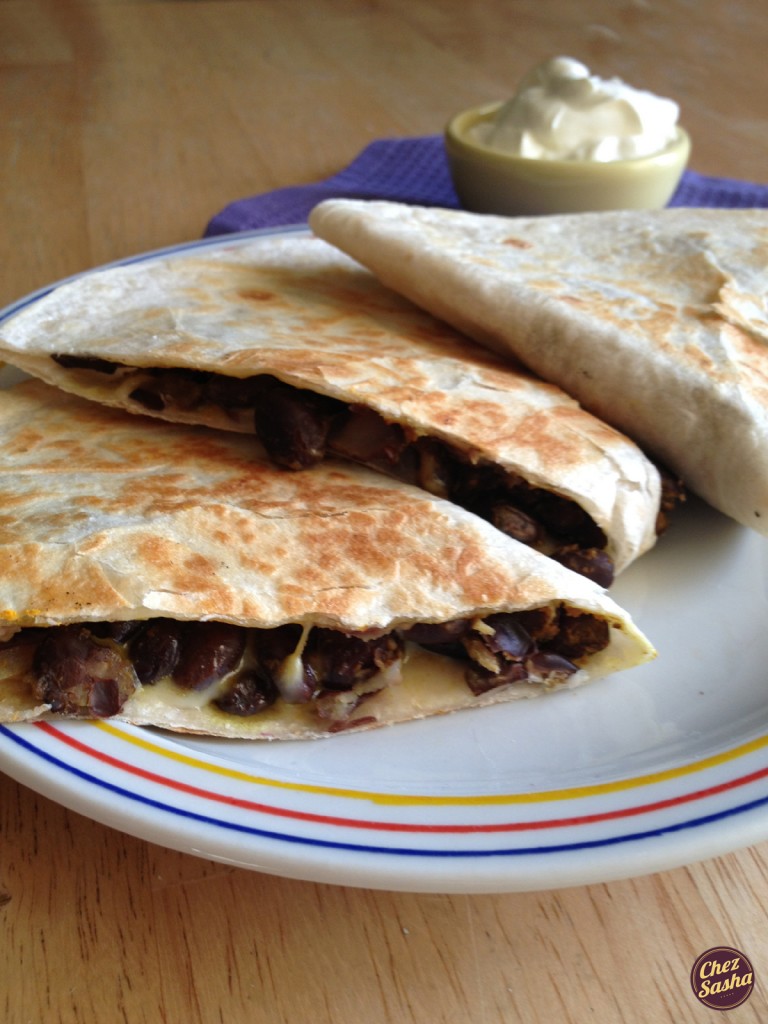
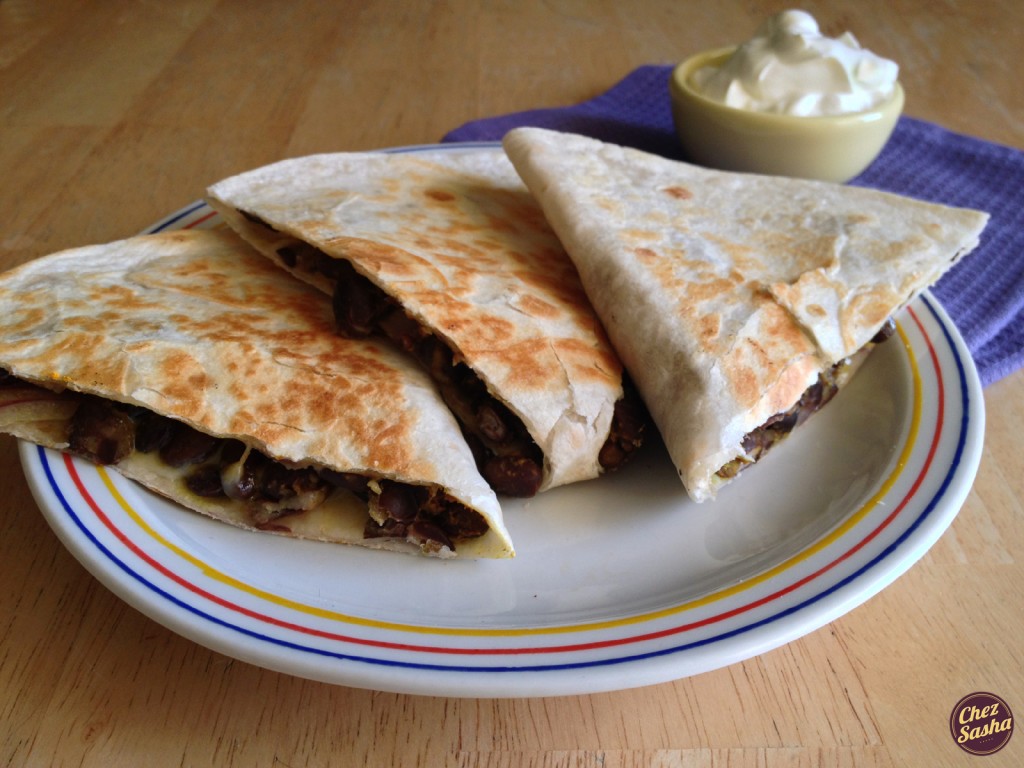
This month’s Sandwich of the Month post is bypassed in favor of this recipe. A quesadilla is kind of a sandwich if you think about it. I mean, it’s still a handheld food consisting of ingredients held together by a bread-like vessel.
This recipe was inspired by a vegan bean quesadilla I had for lunch at a place in Chelsea called Blossom du Jour. It was yummy but unfortunately contained something called “v-cheese”. That’s right, a vegan food imitating one of the most un-vegan and indulgent foods in existence. It was too salty and lacked the most inherent melted cheese property: gooeyness. I’m all for vegan eating, but not when it involves imitating animal-based products with disappointing results, which they usually are. If you’re not real cheese, then why pretend?
Why, “v-cheese”? Why?!
Since that lunch, I knew I had to make my own bean quesadillas - using real cheese - to rectify the situation.
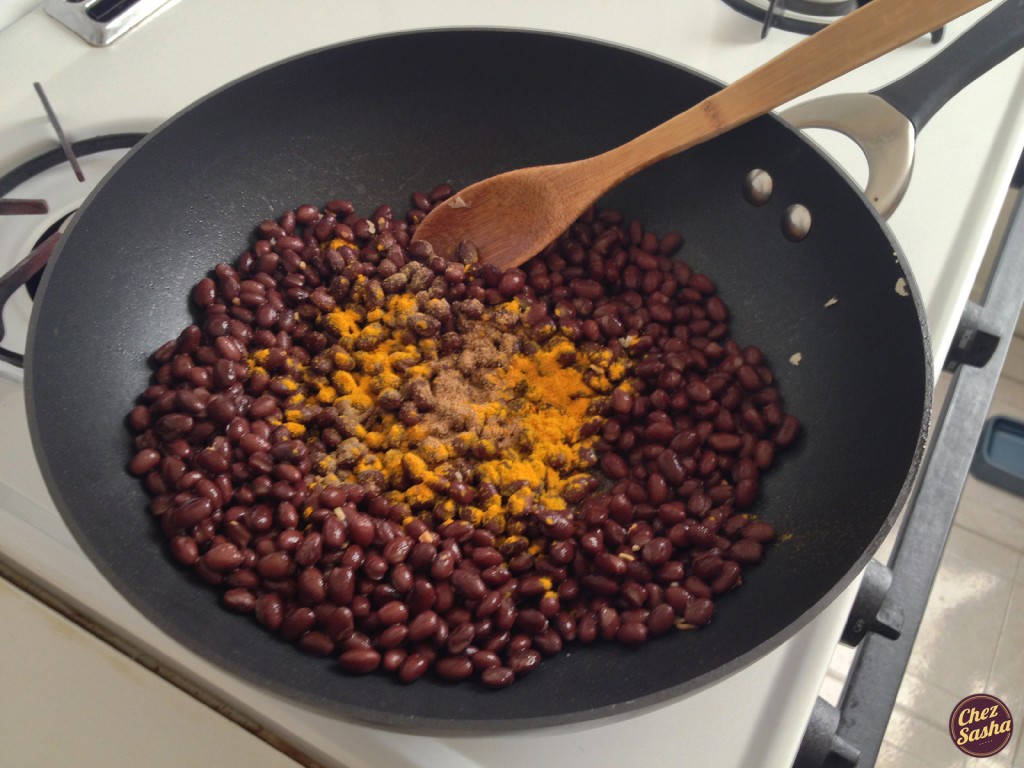
You may be surprised to see that this recipe features turmeric, a distinctly non-Mexican ingredient. The idea to season the beans the way I did came from a bean recipe my mom once made. The pairing was new to me and it really worked, and I was curious about using it in another capacity. And I was right - it totally works in these quesadillas, even if it makes them distinctly gringo.
(Yield: 4 large quesadillas)
Ingredients:
1 tbsp olive oil
2 garlic cloves, minced
2 14 oz cans black beans, drained and rinsed
1 tsp turmeric
1/2 tsp ground coriander
1/4 tsp cumin
Pinches of salt and pepper
4 12″ wheat tortillas
1 c shredded jack cheese
1/3 red onion, sliced
Non-stick cooking spray
Procedure: Heat oil in a large pan and add garlic. Cook for 30 secs and add beans and spices. Stir and cook until warmed through, about 3 min. Taste and re-season if necessary.
Divide the beans amongst the tortillas; top with cheese and onions. Fold over and press quesadilla closed. Heat a large griddle and spray with non-stick spray. Cook quesadillas about 3 min per side, flipping gently with a spatula. Once cheese has melted and outsides are golden brown, remove from griddle and cut into thirds.
Serve immediately, with sour cream and fresh salsa if desired.
Once the winter chill hits the air each year, we all get a craving for the same thing - soup. It’s like clockwork. It goes right along with the desire to layer up sweaters and find someone to cuddle with.
If you don’t experience this feeling, my friend, then you probably have no soul.
Here is the inaugural cold weather recipe from yours truly.
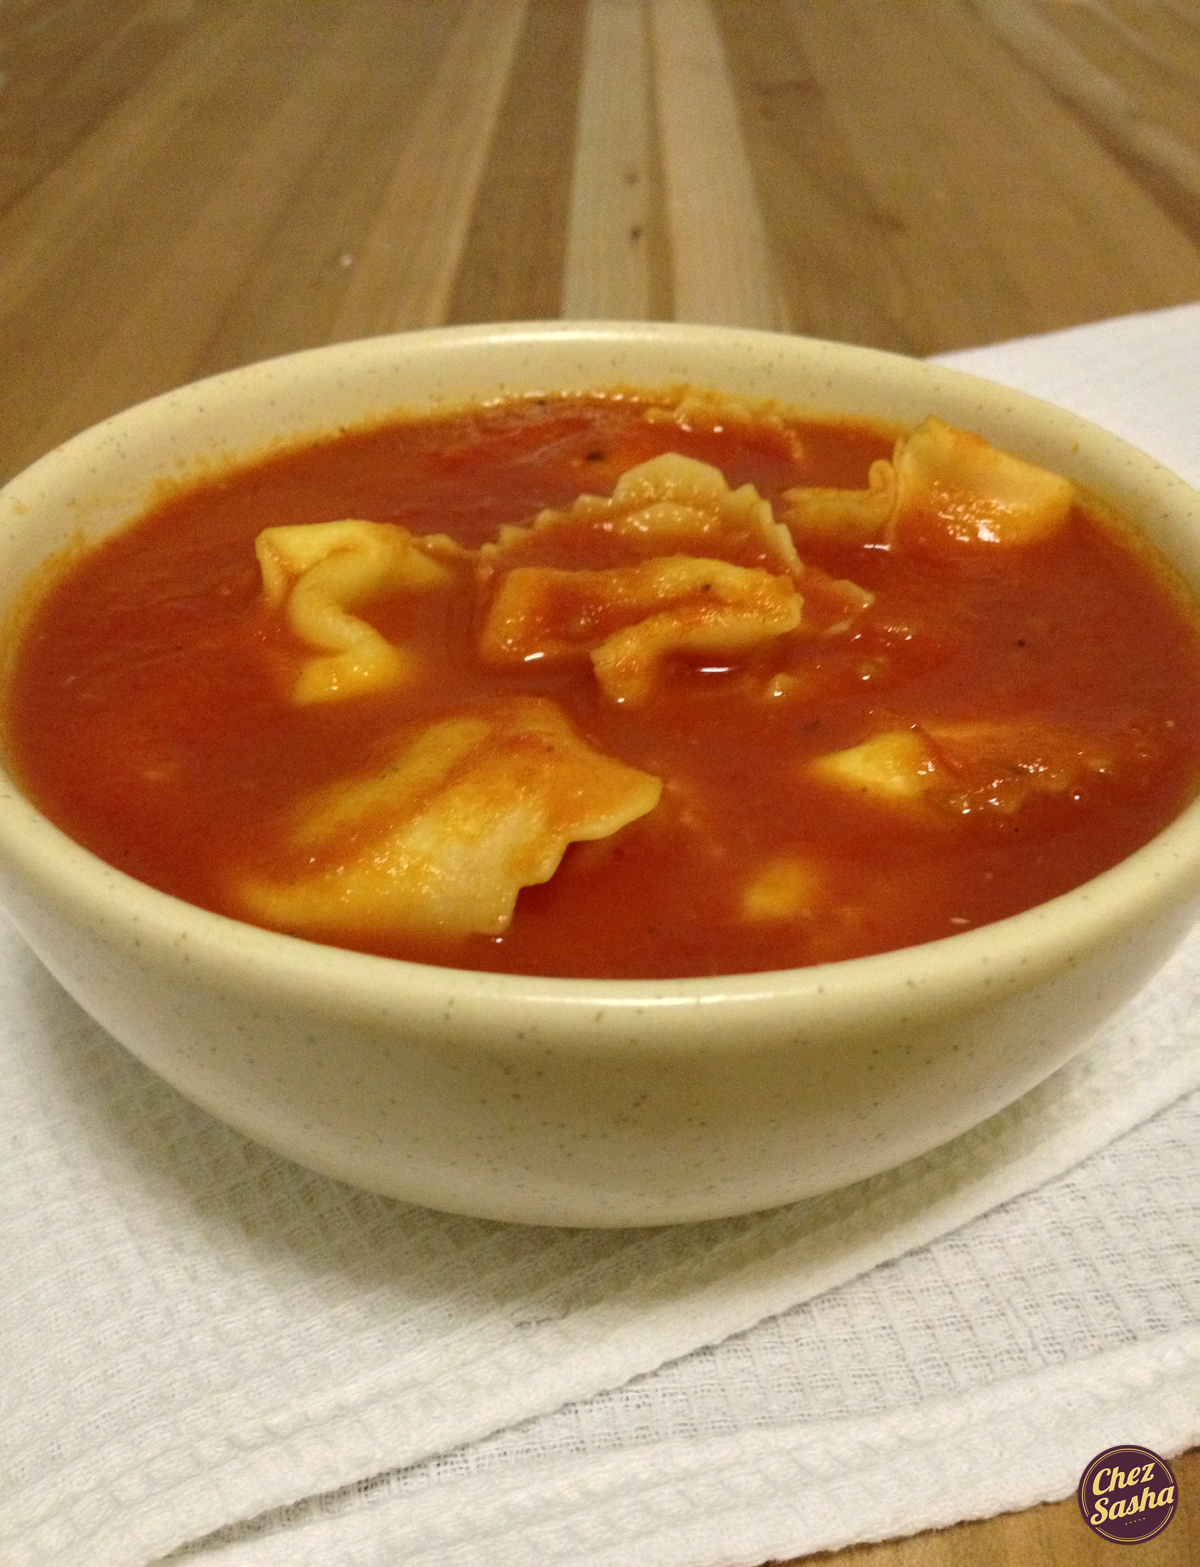
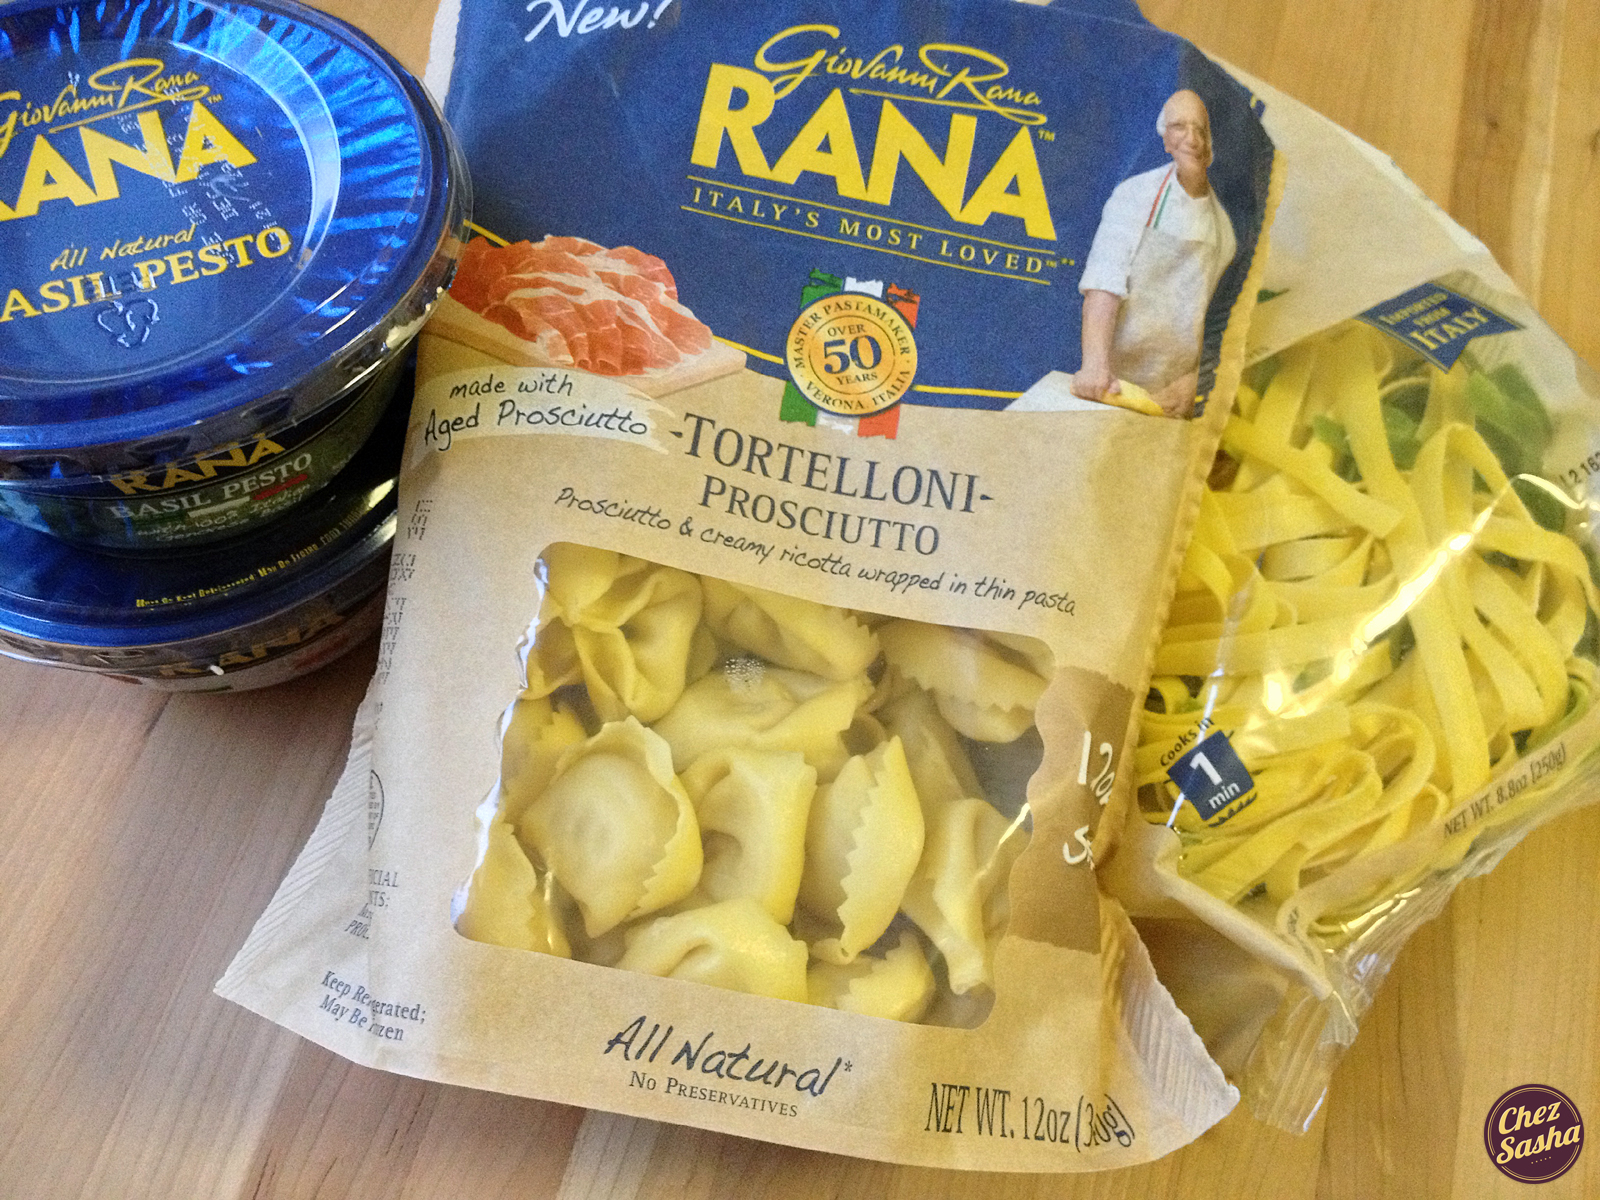
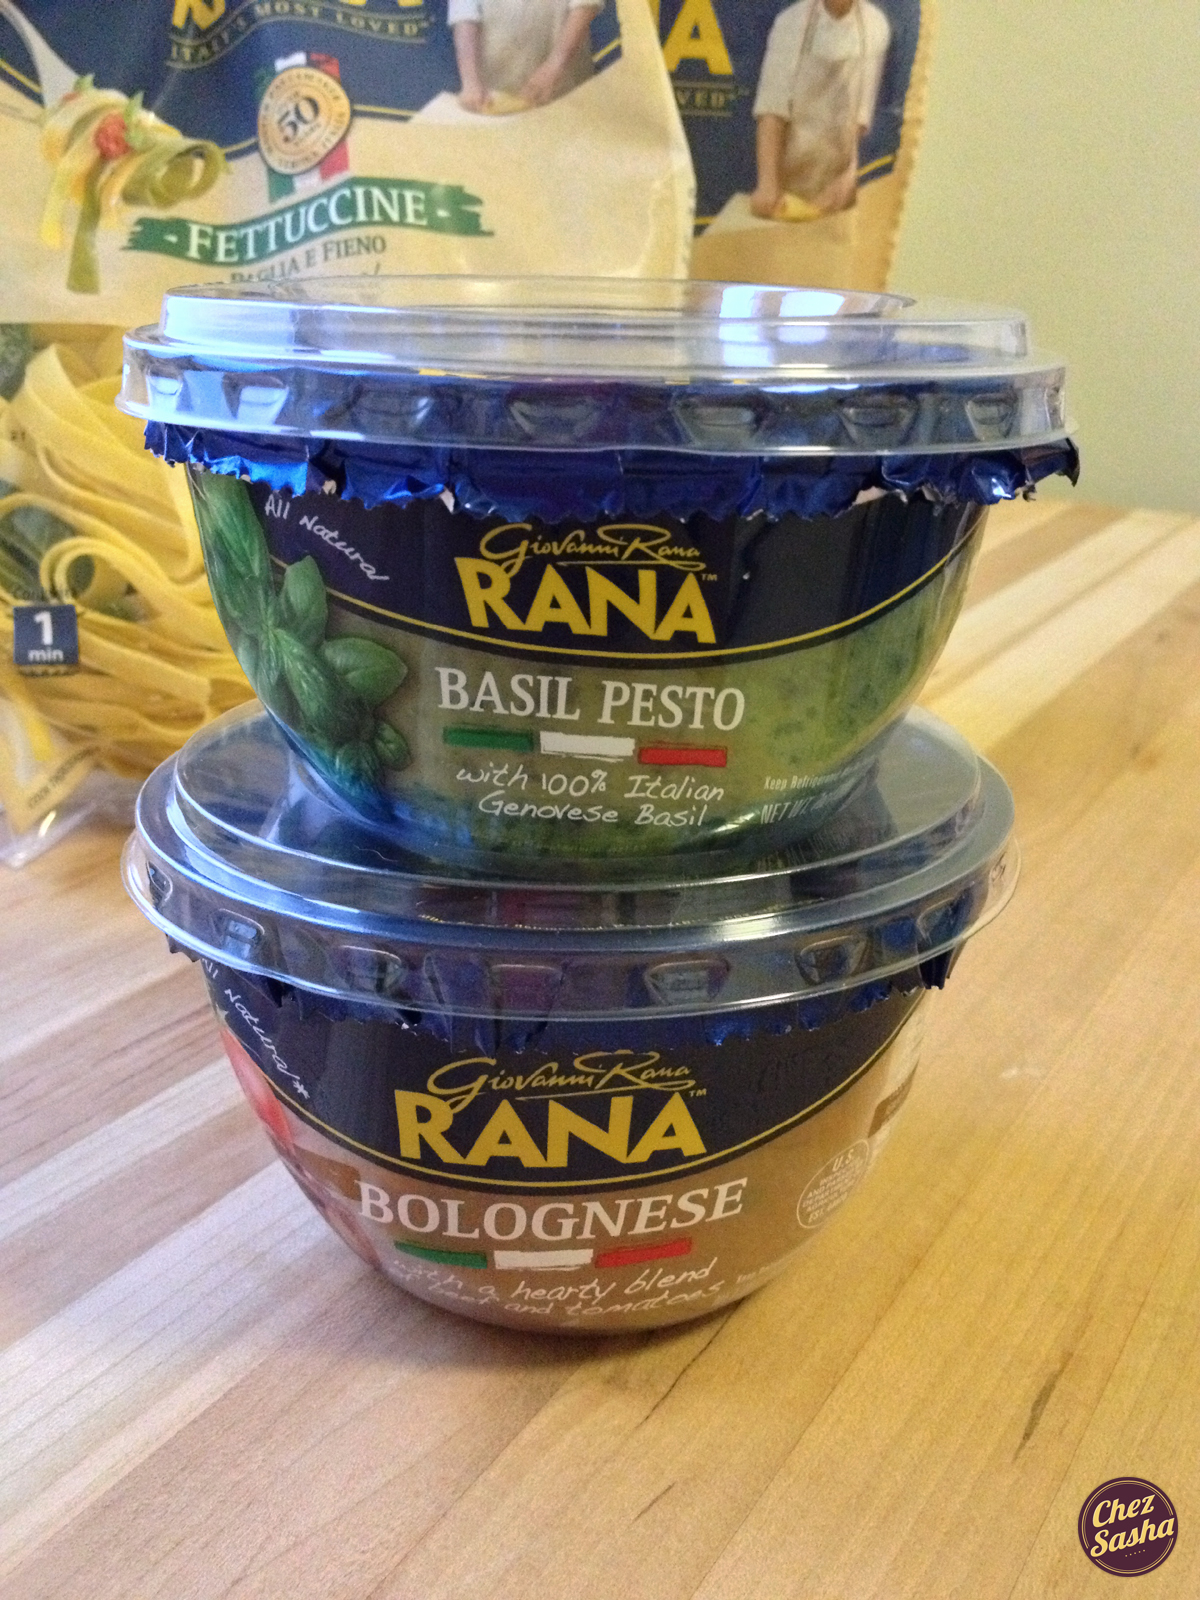
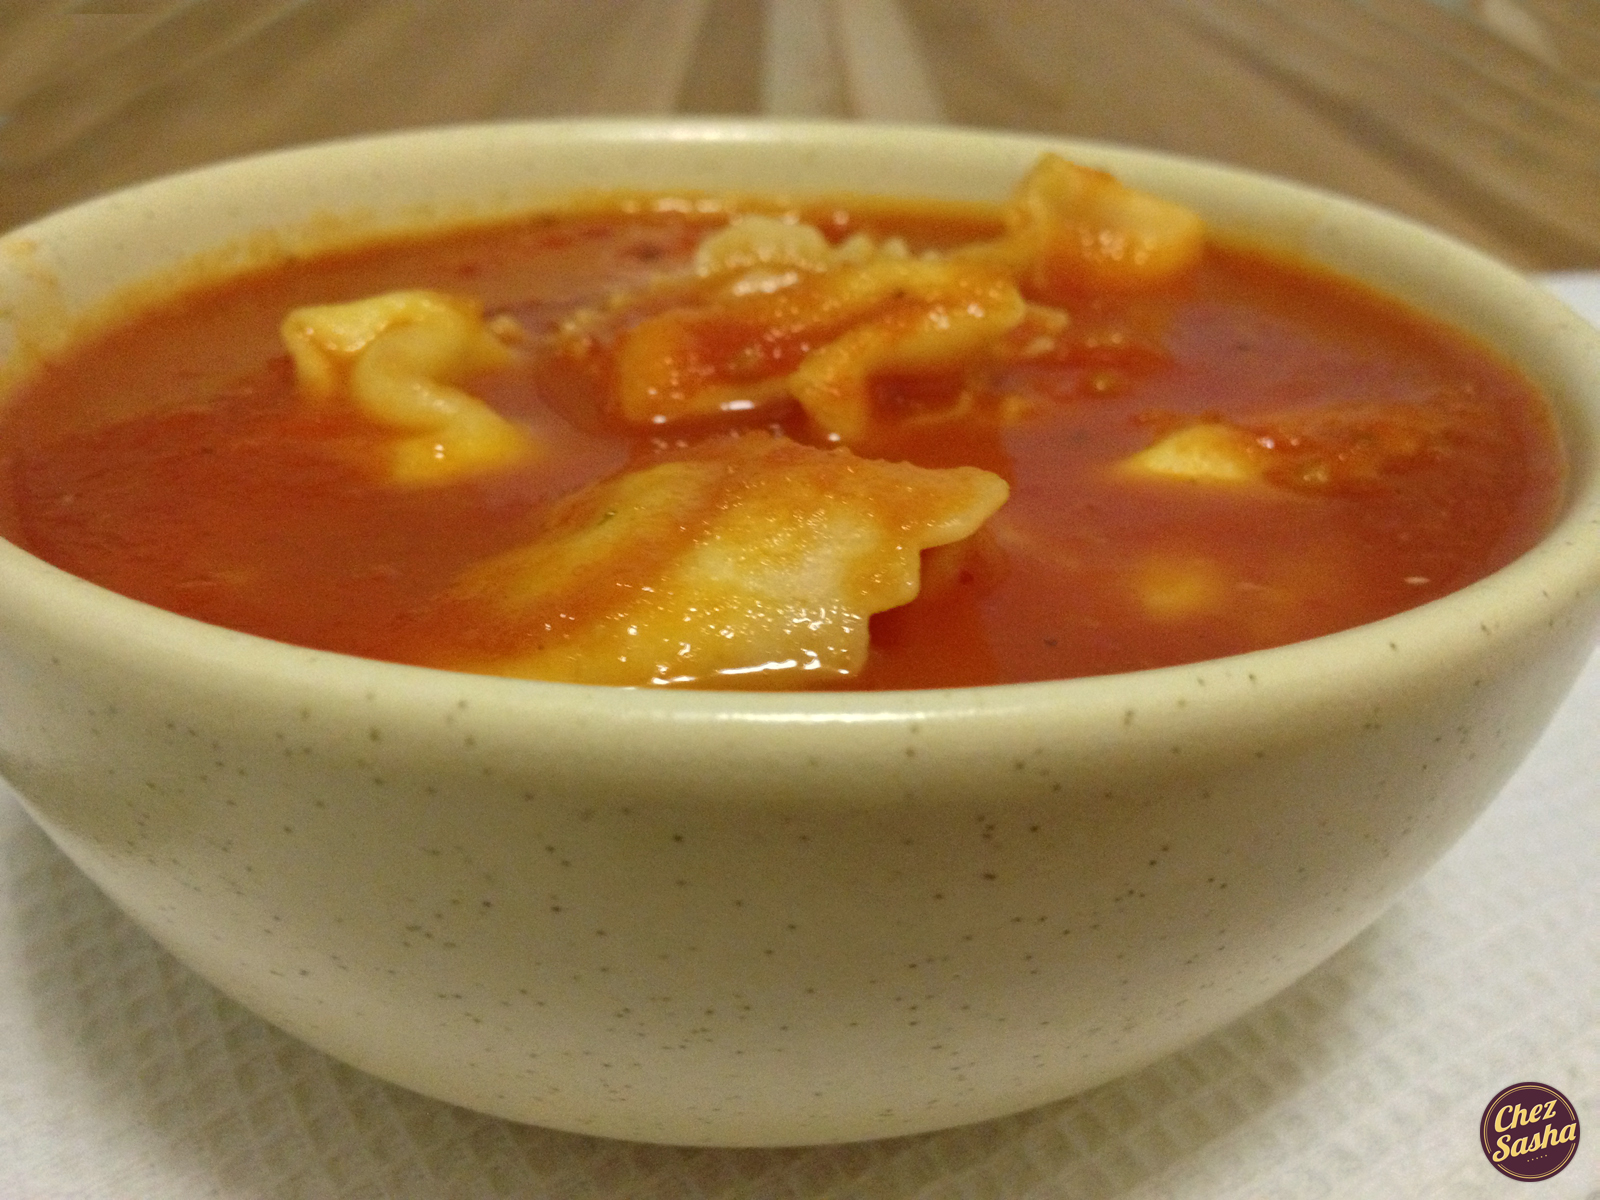
This is the second recipe that I’m posting using the amazing Giovanni Rana products. Their fresh stuffed pasta is as delicate as their pesto is fragrant. Seriously, it couldn’t get any better unless your own nonna handmade it. This is the first store-bought tortelloni that I’ve tasted in which it’s possible to discern the stuffing ingredients that are listed on the packaging - in this case creamy ricotta laced with salty, smoky pieces of prosciutto.
(Yield: 6 servings)
Ingredients:
2 tbsp olive oil
1 large yellow onion, diced
3 garlic cloves, minced
2 28 oz cans whole tomatoes
1 14 oz can low-sodium chicken broth
1 tbsp balsamic vinegar
1 tsp dried basil
1/3 tsp (or to taste) cayenne pepper
Salt + pepper
1 12 oz package Giovanni Rana prosciutto tortelloni
Procedure: Heat olive oil in a large soup pot over a medium-low flame. Add onion and garlic with a pinch of salt and cook until softened, stirring frequently, about 4 min. Add tomatoes, chicken broth, vinegar, basil, cayenne and a pinch of black pepper. Stir, cover tightly with a lid, raise heat to high and bring to a boil. Once boiling, reduce heat to low, crack lid and simmer for 10 min.
Take off heat and blend until smooth using an immersion blender (always exercise extreme caution and follow manufacturer’s instructions when using an immersion blender, especially with hot foods). Place soup over a medium flame and bring back to a boil. Taste and re-season if necessary. Add tortelloni and gently stir. Cook for 3 min. Take off heat and serve immediately.
It has been nine days since I last updated my blog and the reason is that I recently switched jobs. I had trouble adjusting to my previous nine-to-five, but since my new position is at a start-up, the hours are basically nine-to-question-mark, which is a whole new ball game. I don’t mind putting in extra hours - I love my new job! - but I so don’t want my blog to suffer. Hopefully after I get more used to the new schedule, I’ll find a way to manage my time better and restore balance to my life.
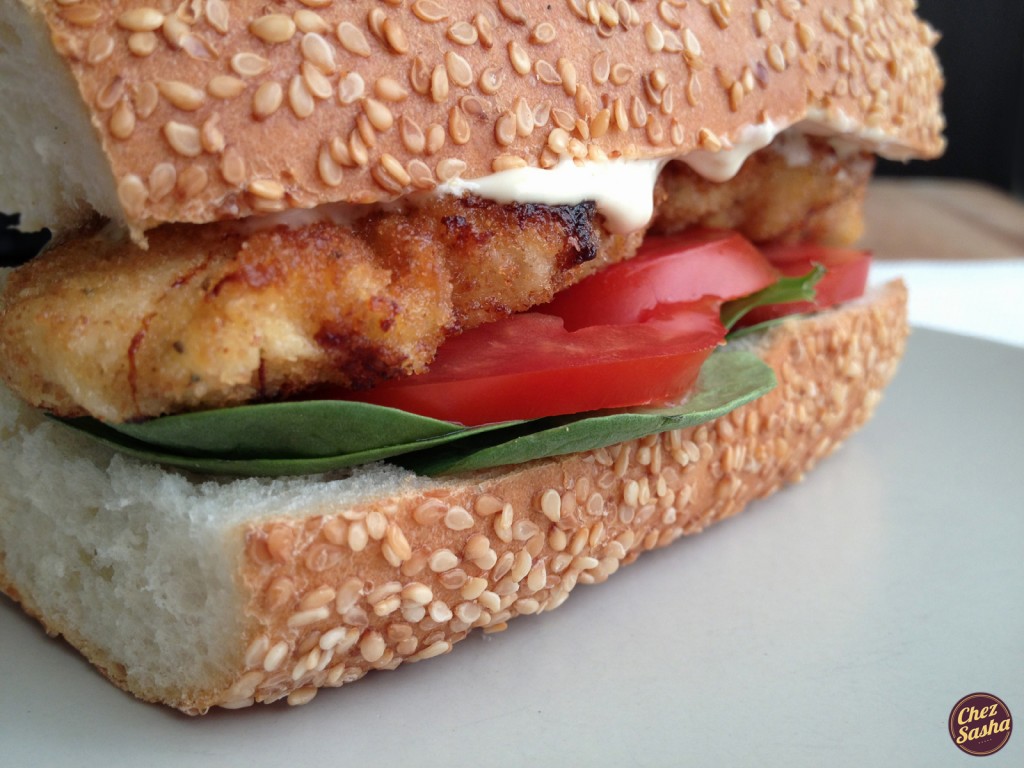
Anyway, let’s talk about this sandwich, shall we?
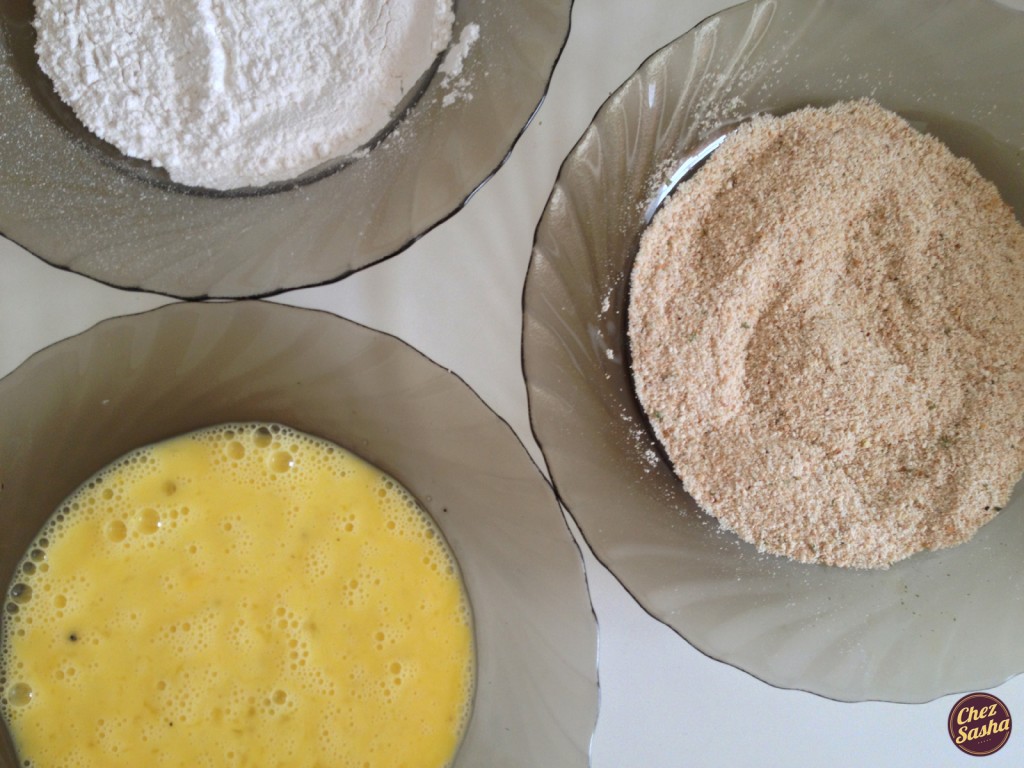
Simple chicken Schnitzel (or cutlets - not really sure if there’s a difference between the two) are something every cook should be able to execute seamlessly. They come together quickly and are delicious enough to please regulars and special company alike. Over the years, finding the three-step dredging process a bit annoying, I have experimented with other methods - like dredging in only flour, or only in bread crumbs. These shortcut alternatives have failed to result in that crispy outside-juicy inside combo that’s so characteristic of schnitzel, so now I know for sure that the three-step method is essential, and dirtying two extra dishes is so, so worth it.
(Yield: 4 sandwiches)
Schnitzel:
3 tbsp olive oil
3/4 lb chicken breast cutlets (organic, if possible)
3/4 c all-purpose flour
1 c plain breadcrumbs
3/4 tsp dried parsley
1 tsp garlic powder
2 eggs
Salt + pepper
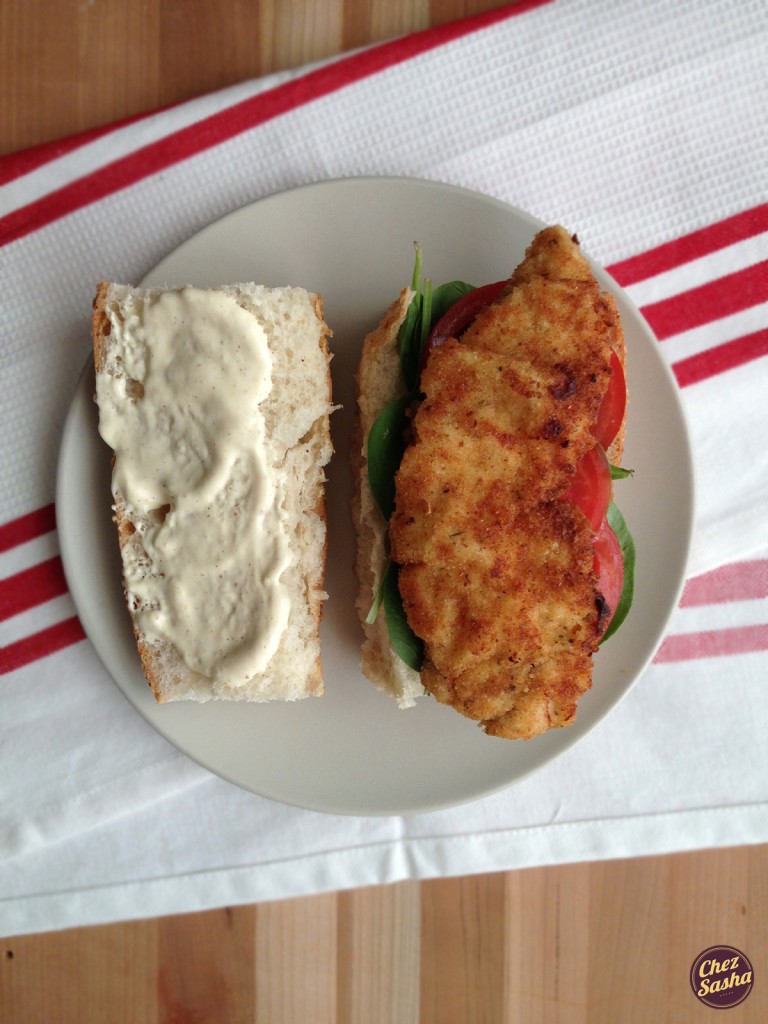
Sandwiches:
4 soft rolls, sliced in half
1 large vine tomato, thinly sliced
Greens of your choice (spinach, arugula, romaine, iceberg lettuce)
3 tbsp mayo
2 tbsp sour cream
1 tbsp brown mustard
1 tbsp fresh lemon juice
Procedure: Prepare three shallow dishes - place flour in one, bread crumbs in another, and beat eggs with a tablespoon of water in the third. Season flour and eggs with pinches of salt and pepper, and gently stir to combine. Season bread crumbs with salt, pepper, parsley and garlic powder, and stir.
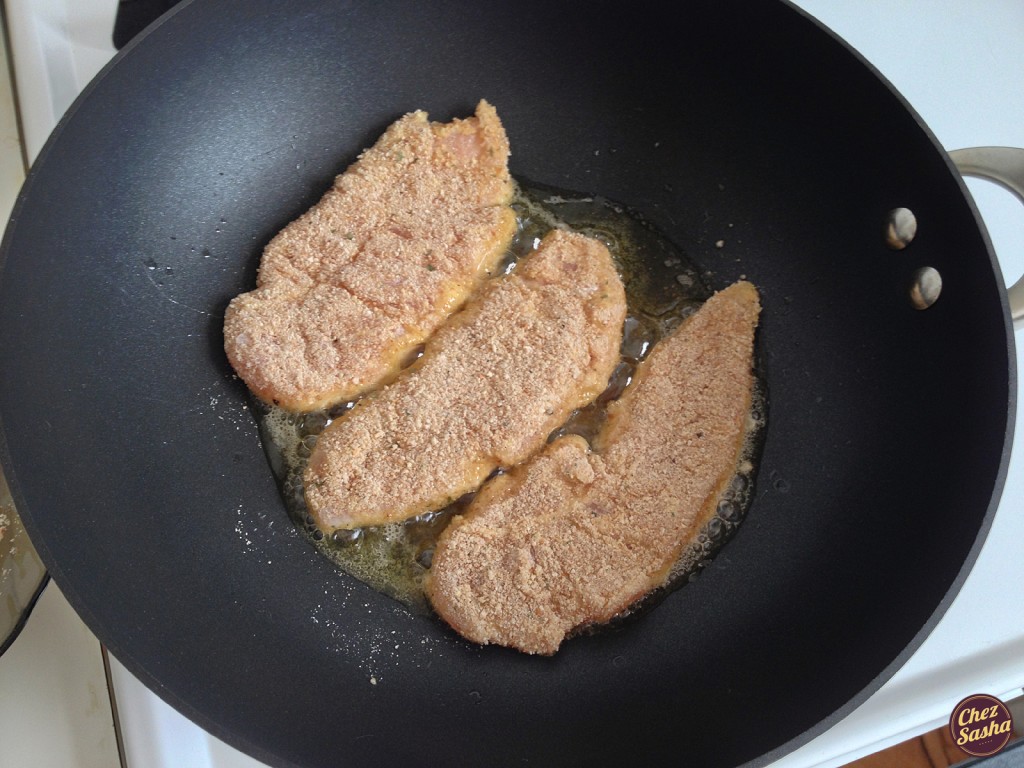
Heat olive oil over medium high heat in a large skillet. Wash and pat chicken dry with paper towels. Pound each cutlet with a meat mallet until 1/4″ thick. Working with one piece at a time, dredge cutlets in flour, egg and then bread crumbs - shaking off access after each dip.
Place into skillet and cook 3-4 min per side, flipping once, until golden brown. (Be sure not to over-crowd the skillet; cook chicken in 2 batches if necessary.)
To make the sauce, combine mayo, sour cream, mustard and lemon juice in a small bowl. Assemble sandwiches while chicken is still warm and serve immediately.
Some people love New York because it’s exciting, busy and non-stop; others hate it for the same reasons. But one thing we can all agree on is that we have the best, most diverse and satisfying fast food in the world. We take hot dogs to obscene heights and have waffles that Belgians themselves can we proud of, just to name a few. Simply put - we got it down! Am I right or am I right?
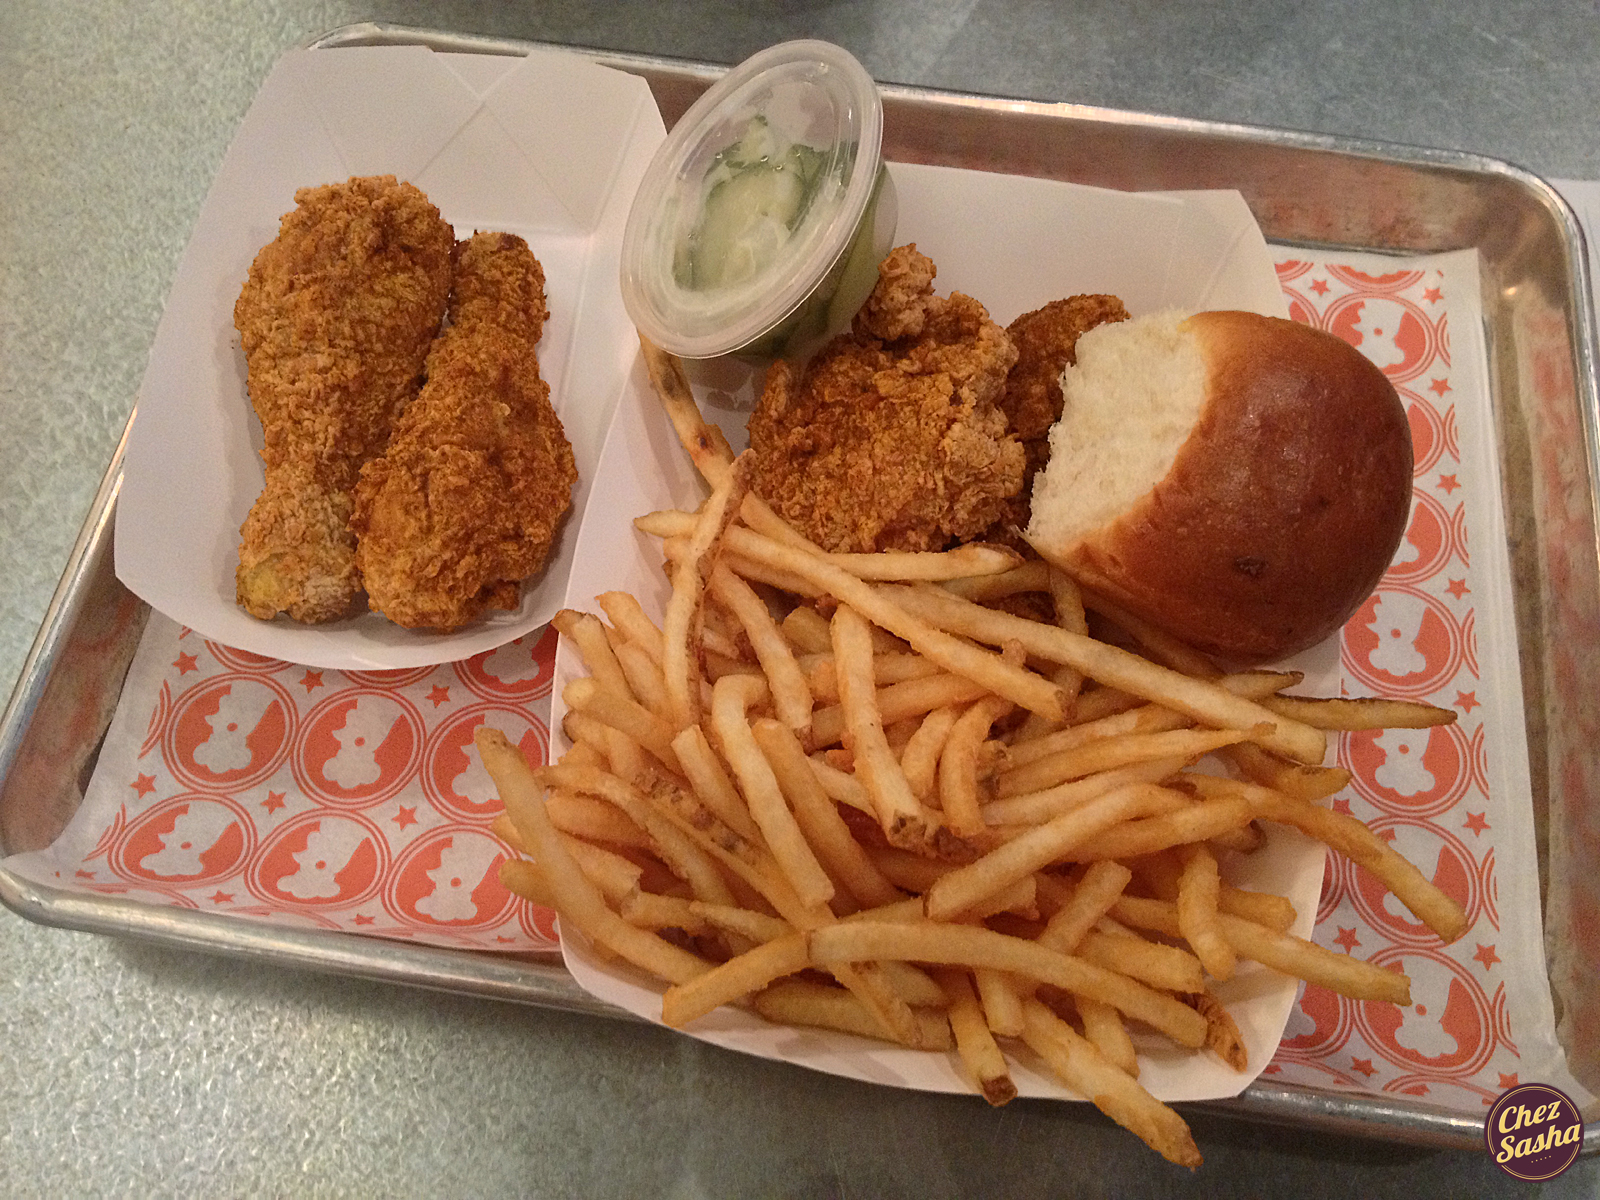
As of this summer, there’s a brand new addition to our outstanding fast food repertoire - a place that focuses on the American food, if there ever was one - crispy fried chicken. Blue Ribbon Fried Chicken is owned by a pair of brothers who have operated a small empire of NYC restaurants for the past 20 years. But this isn’t their first time at the fried chicken rodeo - the chicken has been infamous since its debut at their Blue Ribbon Brasserie.
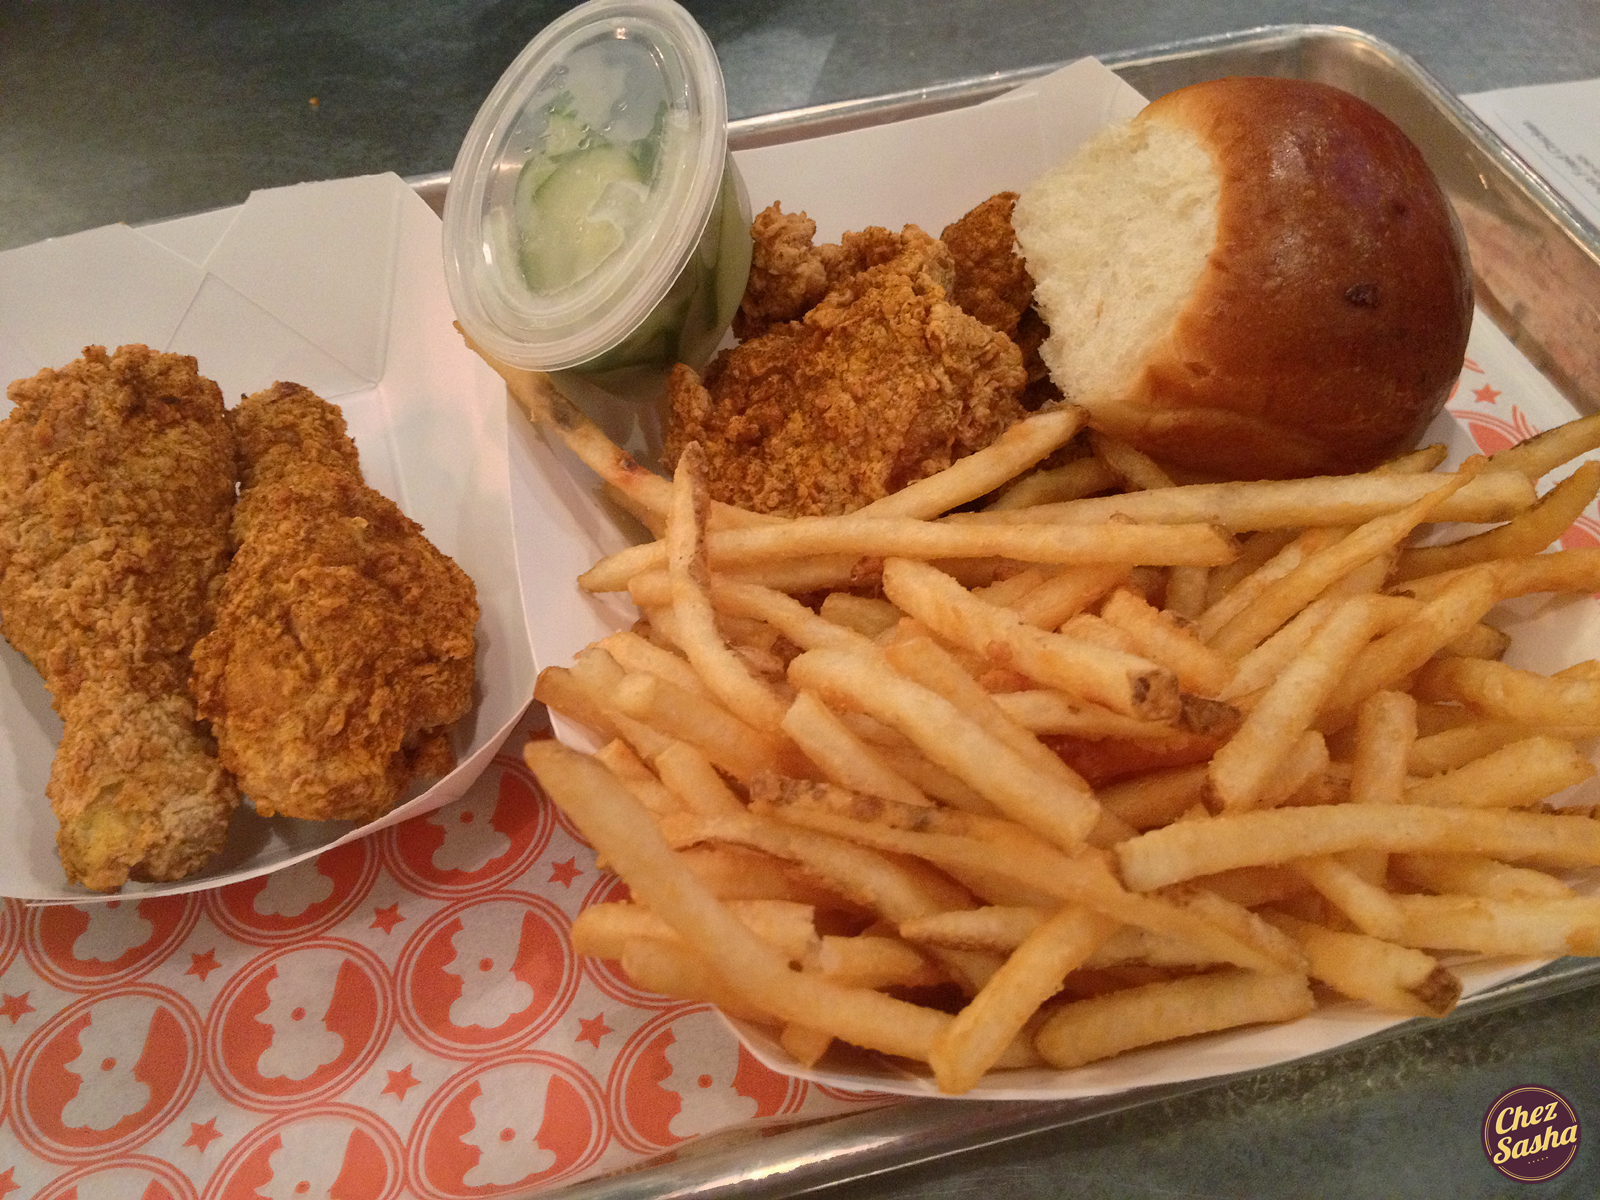
As one with quite a soft spot for fried chicken, I could not wait to try this new eatery, so Rene and I went there within weeks of opening. We ordered the Piece Dark dinner plate ($9) and two drumsticks ($2.50 each). The dinner plate included a drumstick and thigh, a sweet corn roll, sliced pickled cucumbers and a generous serving of fries. The chicken was perfectly crunchy and well-seasoned with a special spice blend that gave it a smokey flavor. It also managed to forgo all the usual bad symptoms of fried chicken: greasy, over-salted and messy to eat. The fries were a major success as well and the house-made pickles provided the necessary acidic component to the whole meal - I only wish there had been more of them. The corn roll, however, proved to be out of place and unnecessary.
To accompany the bird, each table houses a handful house-made sauces, all of which are strangely honey-based and very sweet. This is the only negative comment Rene or I had during the meal; we both wished that the sauces had more variety… and less honey.
I dub Blue Ribbon Fried Chicken the future Shake Shack of fried chicken. That evening, the restaurant was completely packed. Despite its ample cafeteria-style seating, there was not one open seat in the place. People were literally hovering over diners with their trays of chicken, drooling and waiting to snatch the next free seat. Looking around at people’s faces and overhearing their comments, it seems that this place is off to a fantastic start.
There are also salads, sandwiches, ice cream, beer and wine for those not interested in fried chicken.
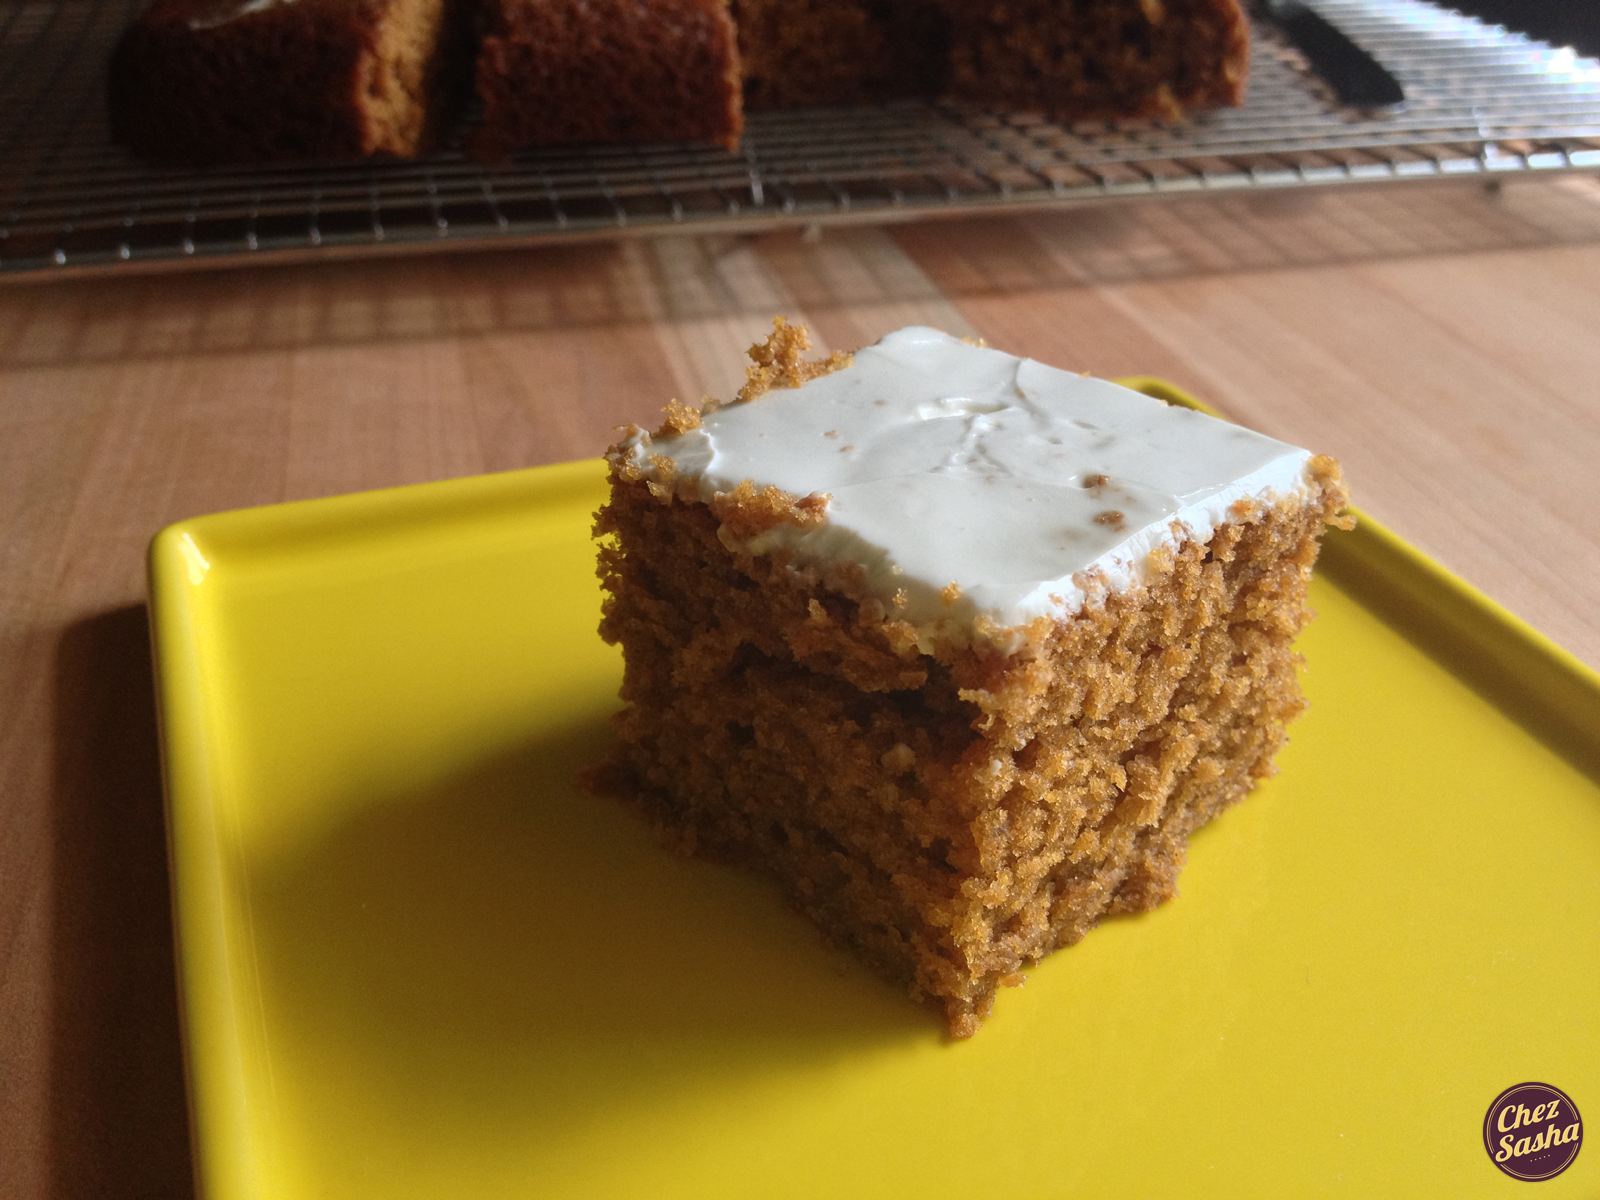
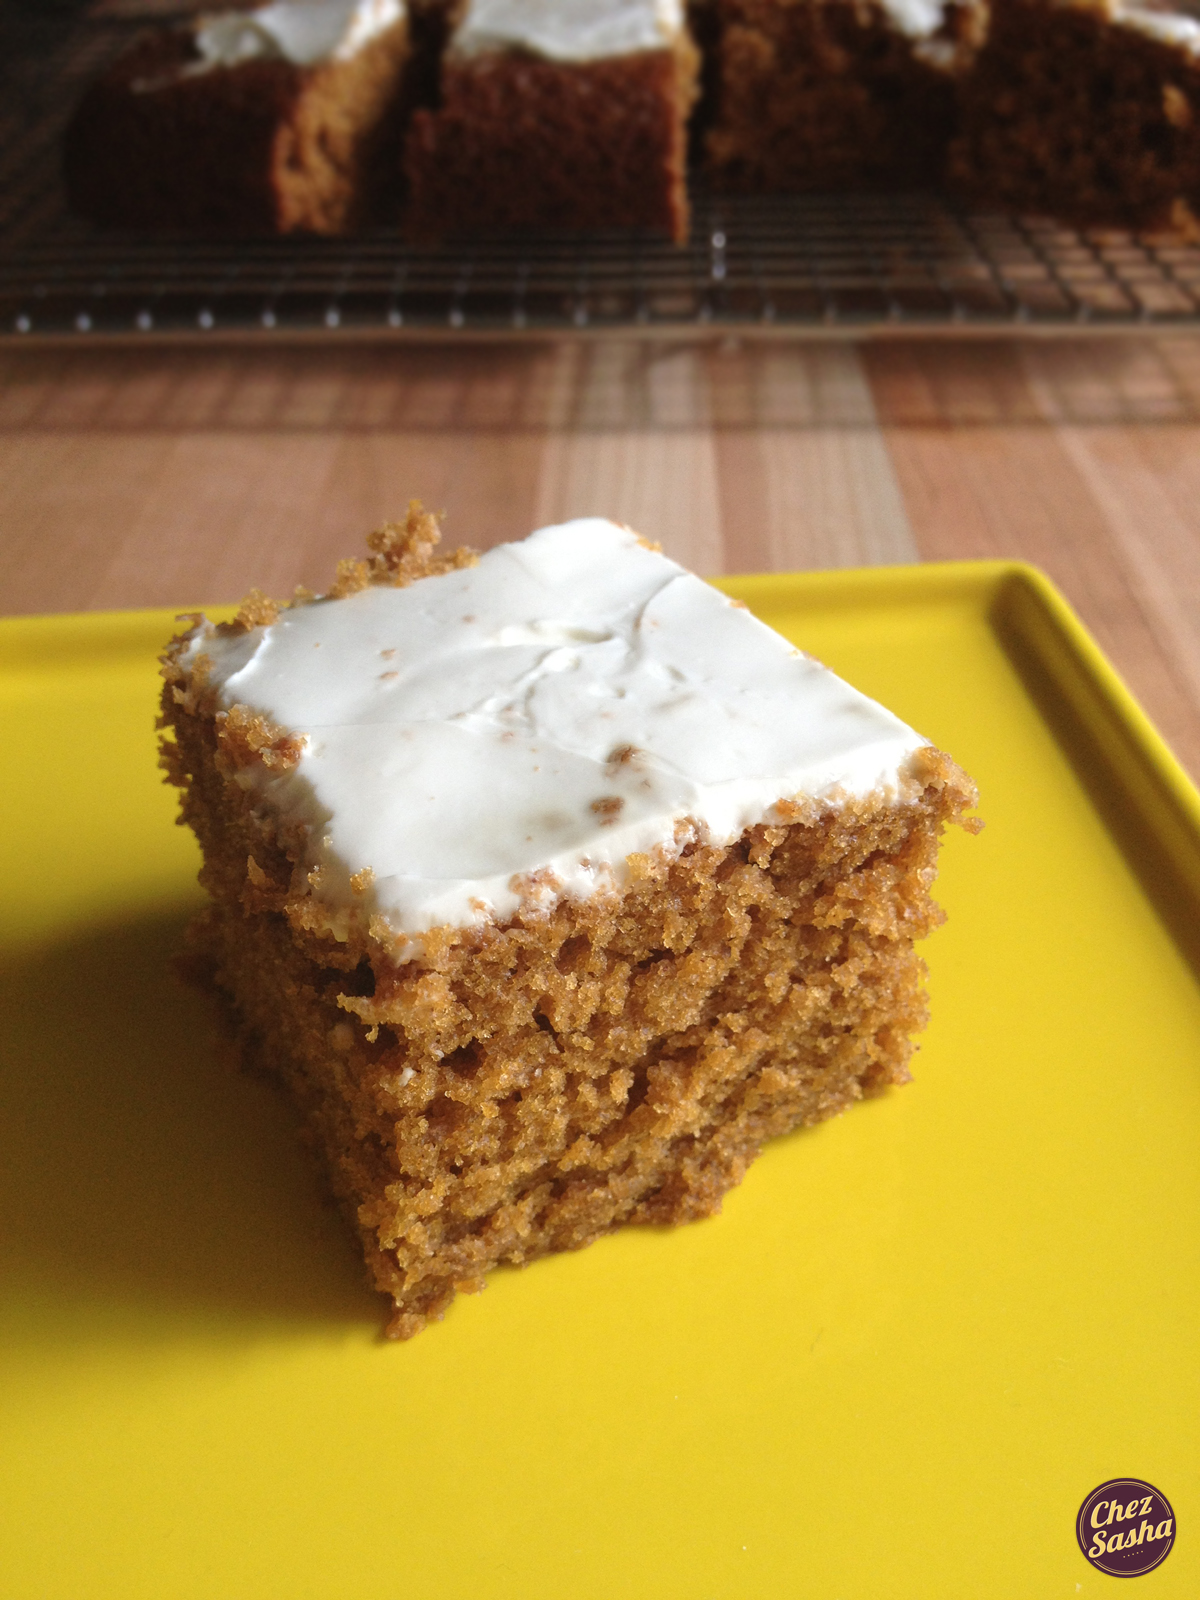
I have had this Bon Appetit ginger cake recipe tucked in my recipe inspiration folder for almost two years. Every time I came across it, I grew very excited and determined to finally make it. And then, clutching the magazine tear-out on my way to the kitchen, I would realize that I don’t have one crucial ingredient - molasses. This happened on several occasions, yet every time it did, I was surprised. Like, shouldn’t I have realized that I don’t have any freakin’ molasses and bought some already? Ah, woe is me.
The thing is, sweets like this (and this) are my weakness. I care little for cupcakes or other overly sweet, super-frosted cakes. It’s the dense, somber desserts that really get to me. Perhaps my Soviet upbringing is to blame.
Alas, I found myself at the supermarket on a humid Saturday morning and finally remembered to buy the stuff.
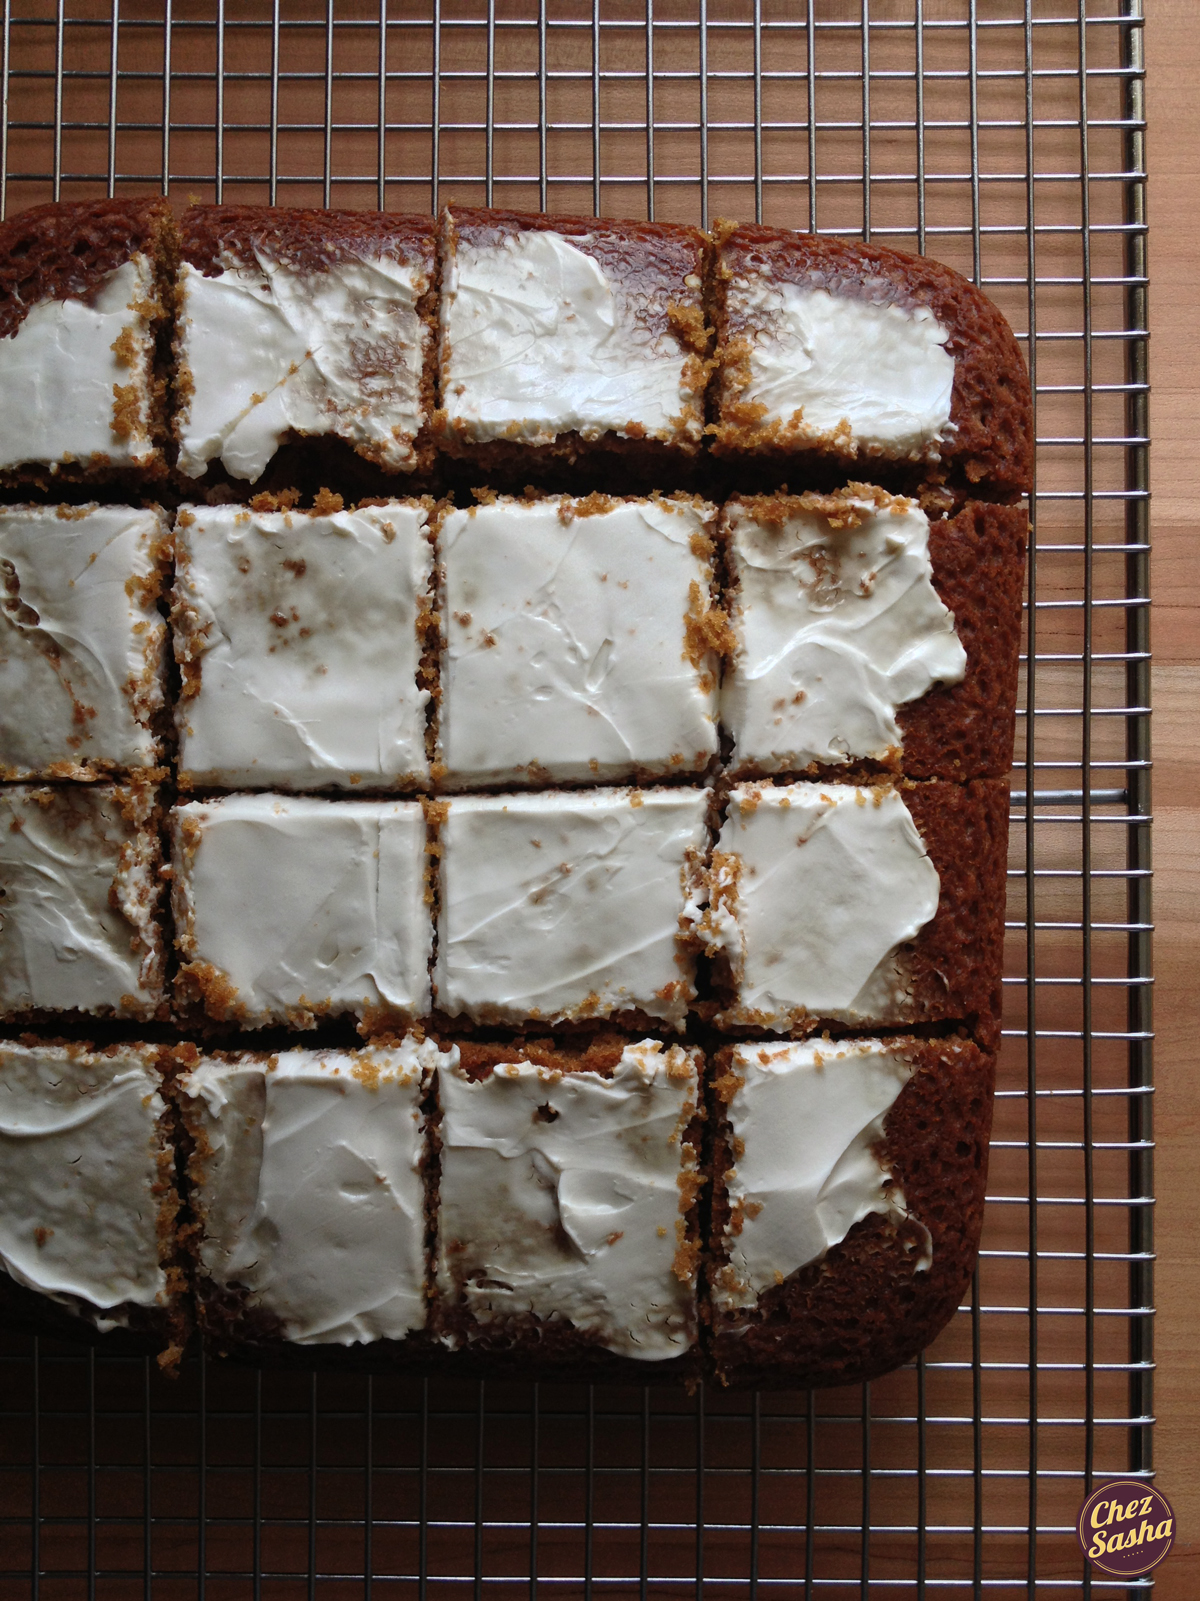
Like a child coming home with a new toy to play with, I excitedly arrived at the kitchen counter and laid out all the ingredients necessary for the cake, finally completed by the molasses. The batter came together in no time, and - with the exception for my being surprised by the dissolving-the-butter-in-boiling-water step - without a hitch. The recipe calls for a whipped cream-lemon curd topping, but again, due to my dislike of frosting, I decided to slather it with some plain old cream cheese instead. (Can’t blame Soviet Russia for this one. We didn’t have cream cheese in the motherland.)
This ginger cake turned out absolutely perfect. Dense, rich and a tad spicy from the ginger and cinnamon. I only wish I hadn’t waited so long to make it.
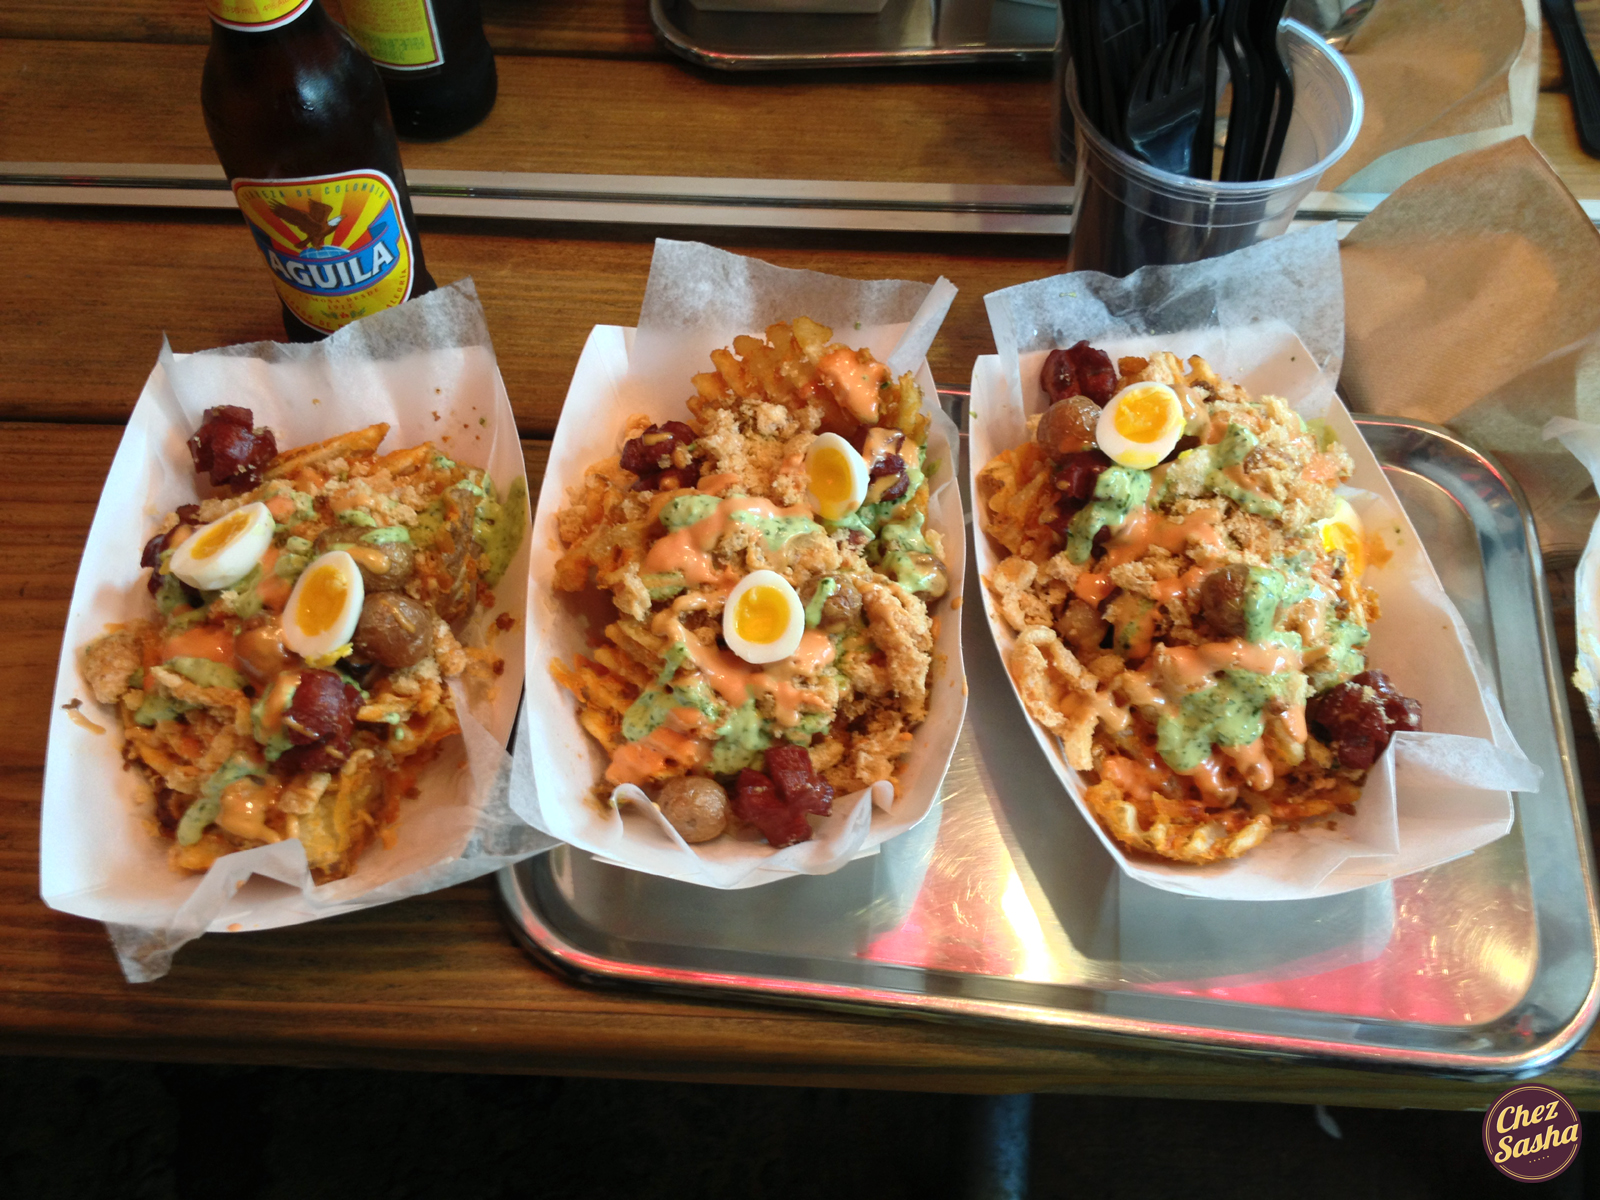
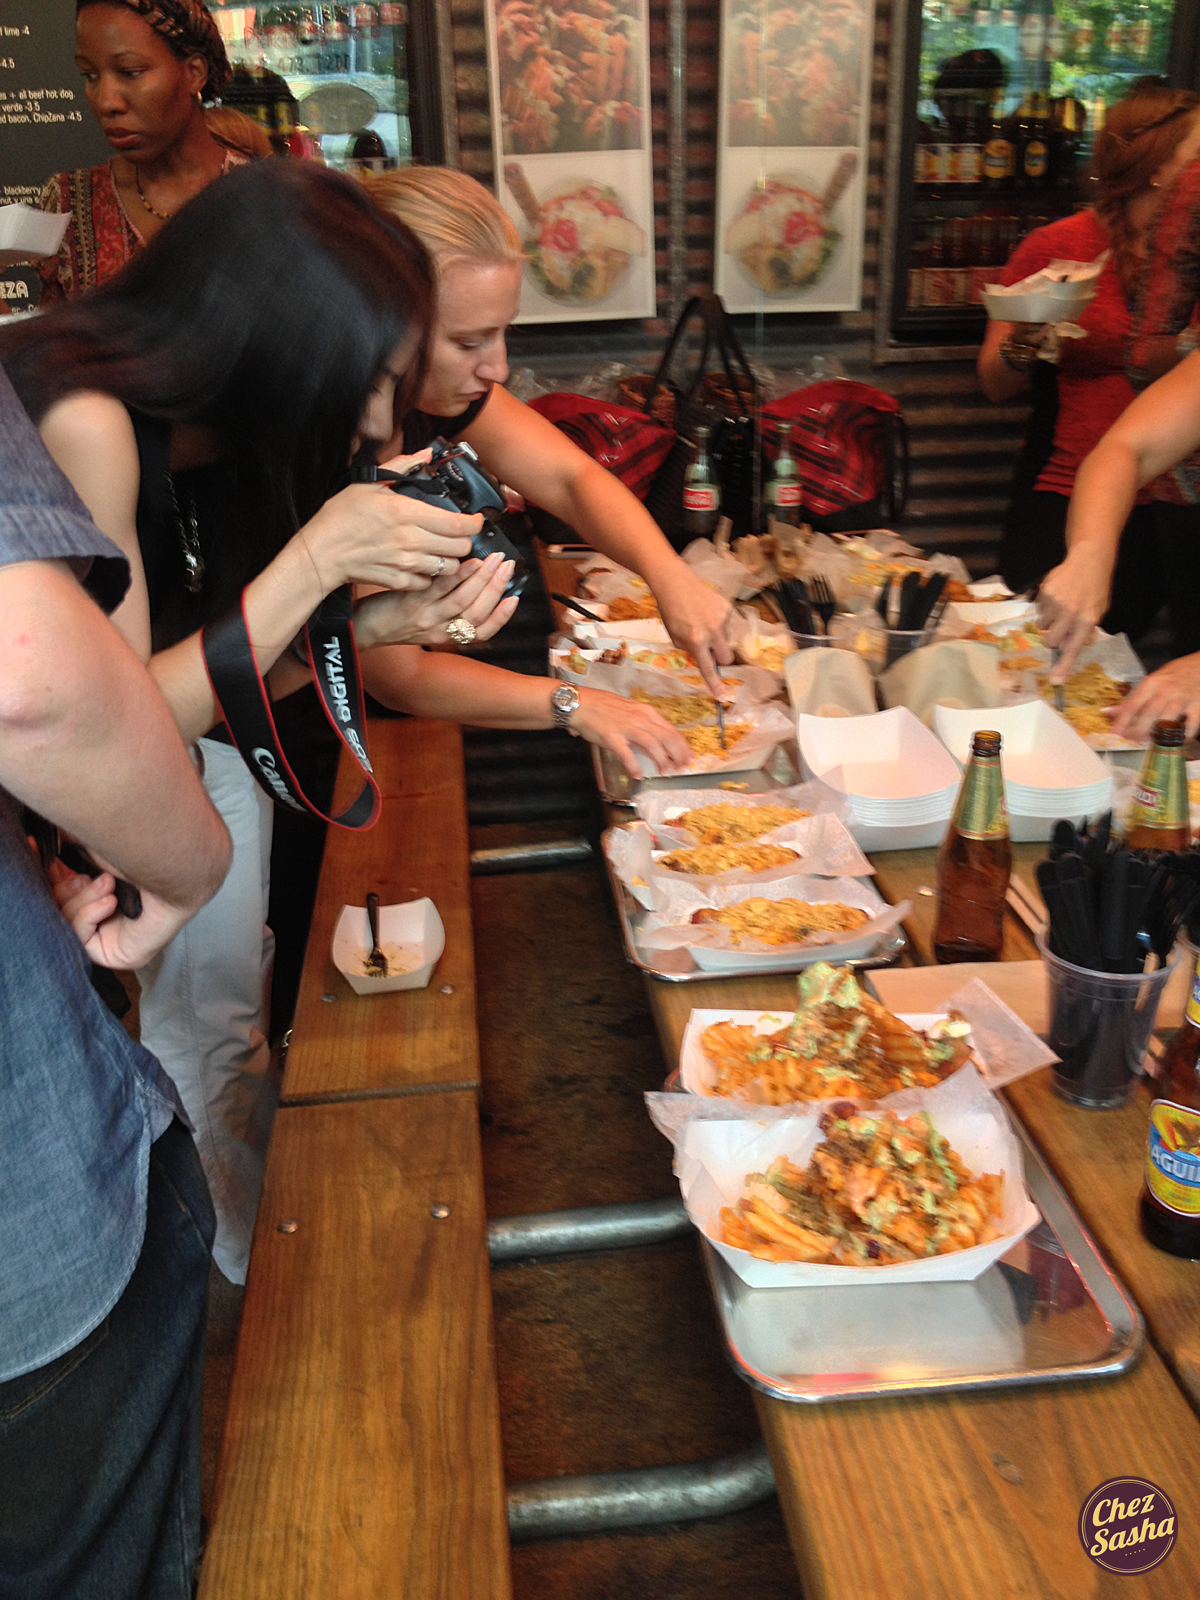
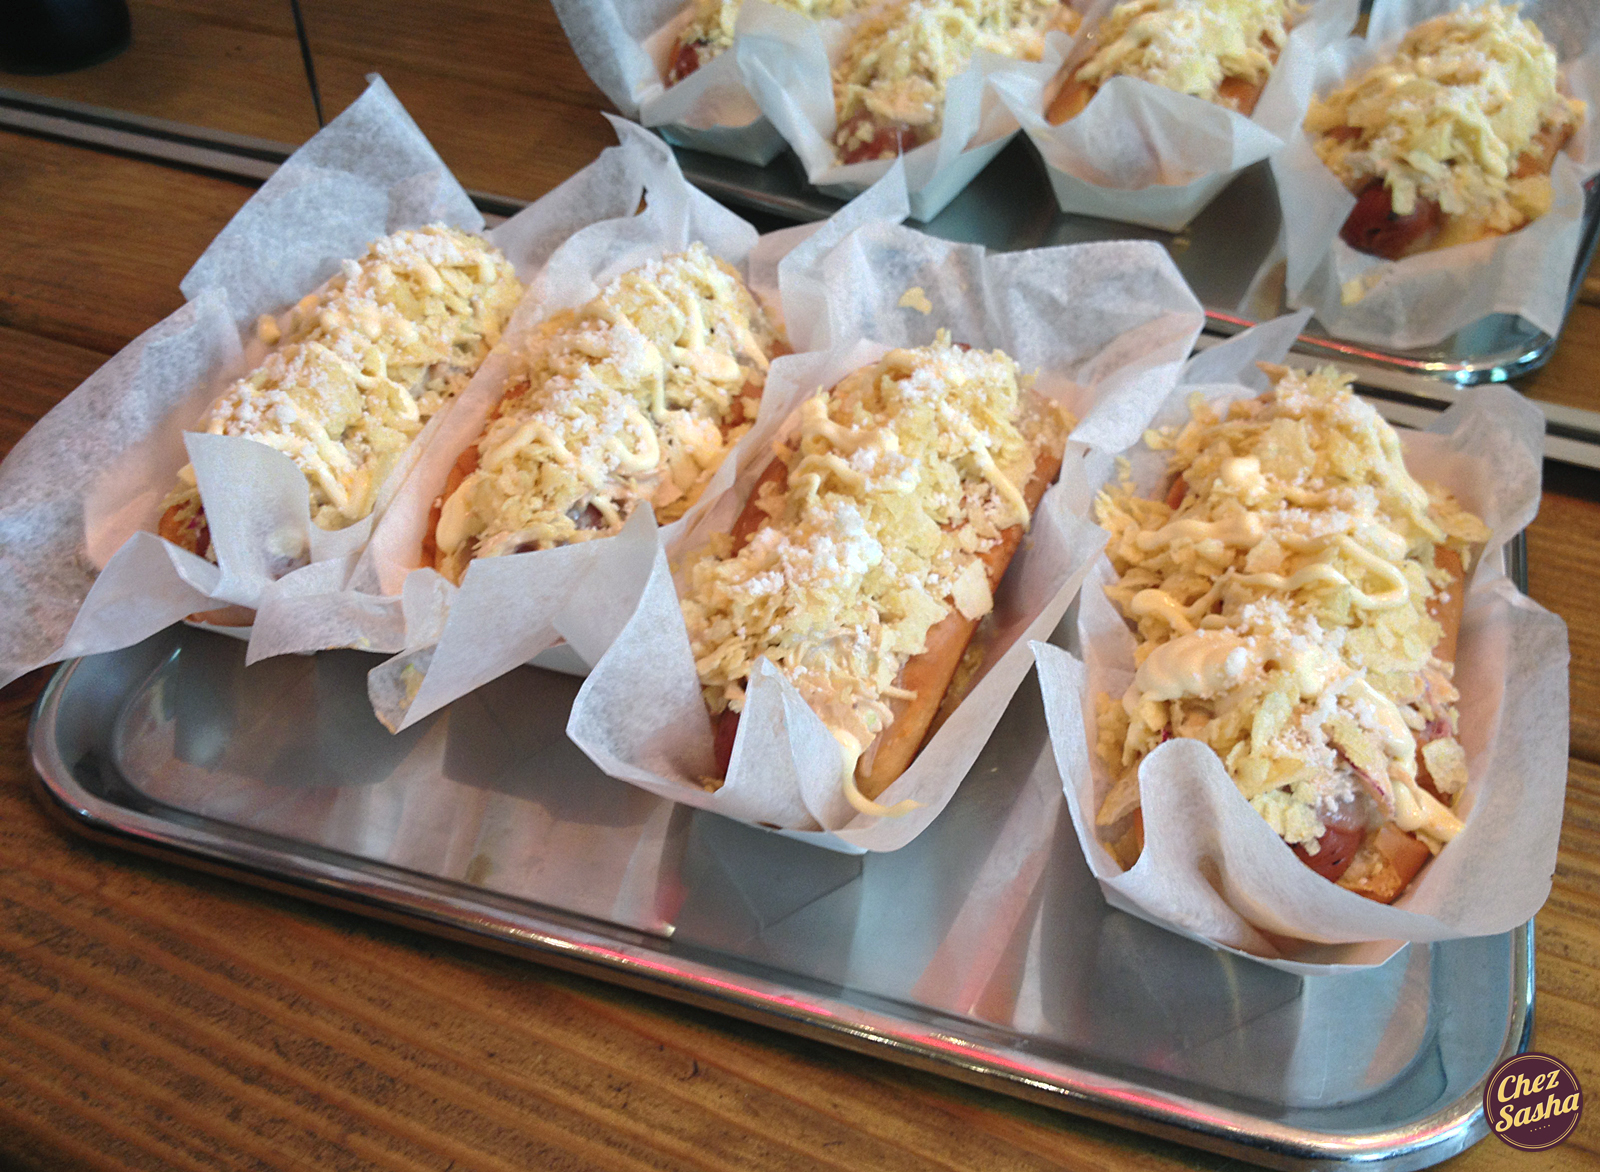
When I initially got the invite to attend a food bloggers’ tasting event at Los Perros Locos, I accepted with no hesitation - I rarely turn down free food, or a chance to socialize with fellow food-crazed New Yorkers. All I knew about the place was that they serve tempting hot dog creations. Being well-versed in New York’s somewhat recent boom in specialty hot dogs (see Crif Dogs, Asia Dog), I thought I knew what to expect. Surely nothing could beat the deep-fried, cheese sauce-topped, and bahn mi-style dogs that I’ve already tried, I thought. But evidently, it gets even crazier.
Located on the Lower East Side - a mecca for dirty bars and overzealous youth - Los Perros Locos channels Colombian street food, specializing in decked out hot dogs and ‘salchipapas’ (the Colombian answer to poutine). The decor of the place, which is equally as fun, pays homage to the owner’s Miami upbringing, with pink neon lights, and steel and wood paneling.
Now, you know those crazy nights when in the midst of your crawl home from the bar, you suddenly get a relentless craving to munch on something cheesy, meaty, crunchy and cheap? Well, the owner took that very concept and turned it into a an actual eatery. The hot dogs we got to sample at the event were otherworldly. The all-beef dogs were topped with everything from cheese sauces, to house-made slaws, chimi churri, crushed potato chips and everything in between. They were the perfect messy food that every drunk college kid dreams of; and fun to eat, too.
We also got to try the salchipapas - a deliciously gluttonous dish of waffle fries topped with spicy mayo, deep-fried bacon, chicharones, salsa verde and quail eggs. I think that’s about all I have to say about that… *drools*
What happens when food bloggers see food.
Hanging out in that environment, drinking beers with awesome people, and devouring this unbelievable food, it eventually did feel like a college party in there. It was honestly one of the funnest blogger events I’ve been to. Many thanks to Sherry for organizing it!
Be sure to stop by next time you’re crawling home from the LES. You won’t regret it - I promise.
Drunk college kids take note: Los Perros Locos is open til 4am.
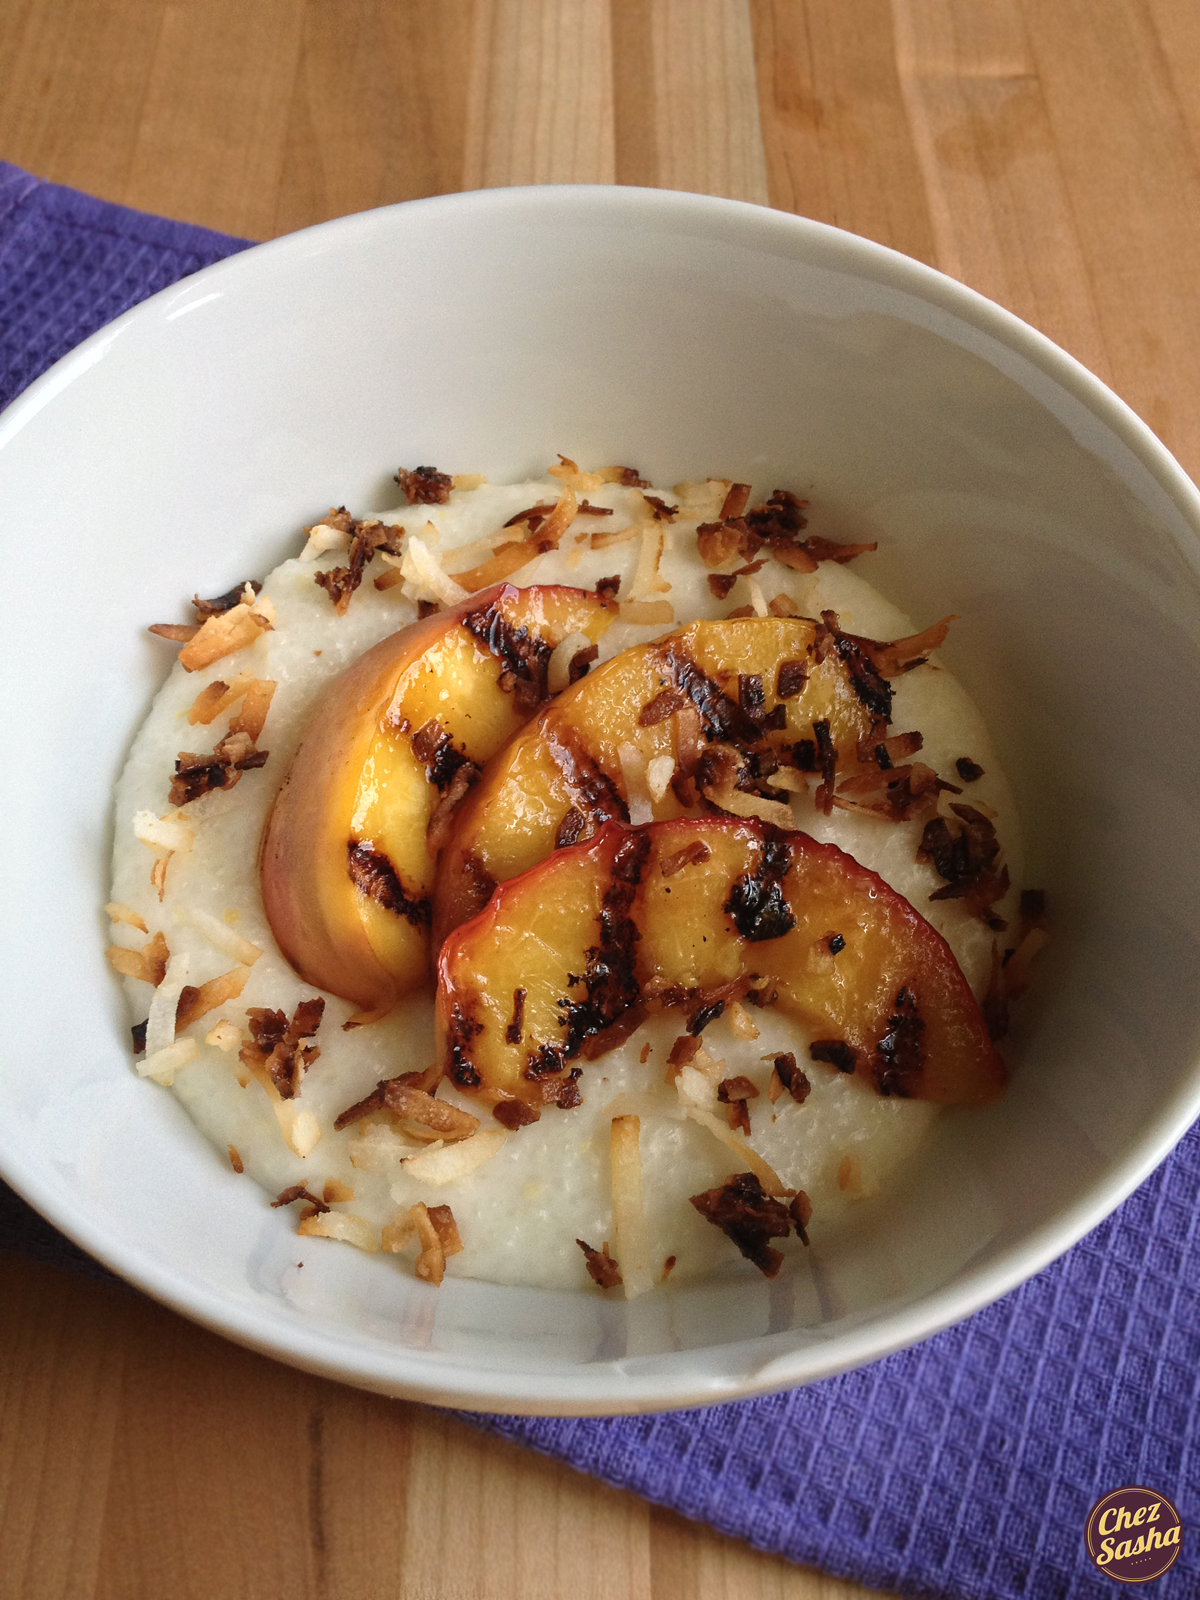
Way back in the winter - when peaches were still a distant dream - I found myself pondering over grits. I dared not doubt my love for the cheesy kind I have with my eggs (or the spicy baked version with tomatoes) but was yet to explore the sweet variety. Within a few seconds, this idea came to me. Silky coconut milk, crunchy coconut flakes, sweet juicy peaches - it just had to work. And it did. Just as I suspected, sweet grits are as delectable as the savory kind. Now the possibilities are limitless!
These sweet coconut grits can be served for breakfast, or for dessert if in smaller portions.
(Yield: 2 servings)
Ingredients:
1 14 oz can light coconut milk
1/3 c quick-cooking grits
A pinch of salt
2 tsp sugar
1 tbsp butter
1 peach, sliced
2 tbsp coconut flakes
Procedure: Bring coconut milk to a simmer in a small pot. Gradually whisk in grits. Reduce heat to low, add salt and sugar, cover tightly with a lid and cook for 5 min, stirring frequently. Turn heat off and whisk in butter. To grill peach slices, heat a grill pan over medium heat. Cook peaches 2-3 min per side, flipping once, until brown grill marks appear. To serve, divide grits into 2 bowls. Top with peaches and coconut flakes.
Growing up is hard, but I’m glad that we do. A few summers ago, I went to Otto - Mario Batali’s renown pizzeria enoteca - with my friend Michelle. The thin-crust pizza that we tasted had slices of prosciutto, a heap of arugula and a drizzle of olive oil on top. It was not the chewy NYC pizza that I had grown accustomed to. “What is this greenery,” I wondered, “and just what is it doing on my pizza?”
Fast forward to now and arugula is one of my favorite ingredients - I put it on, like, everything. But back then, I couldn’t appreciate its clean earthiness and how it intermingled with the sharp flavor of the pie. I bet if I ate that pizza today, my opinion would be way different.
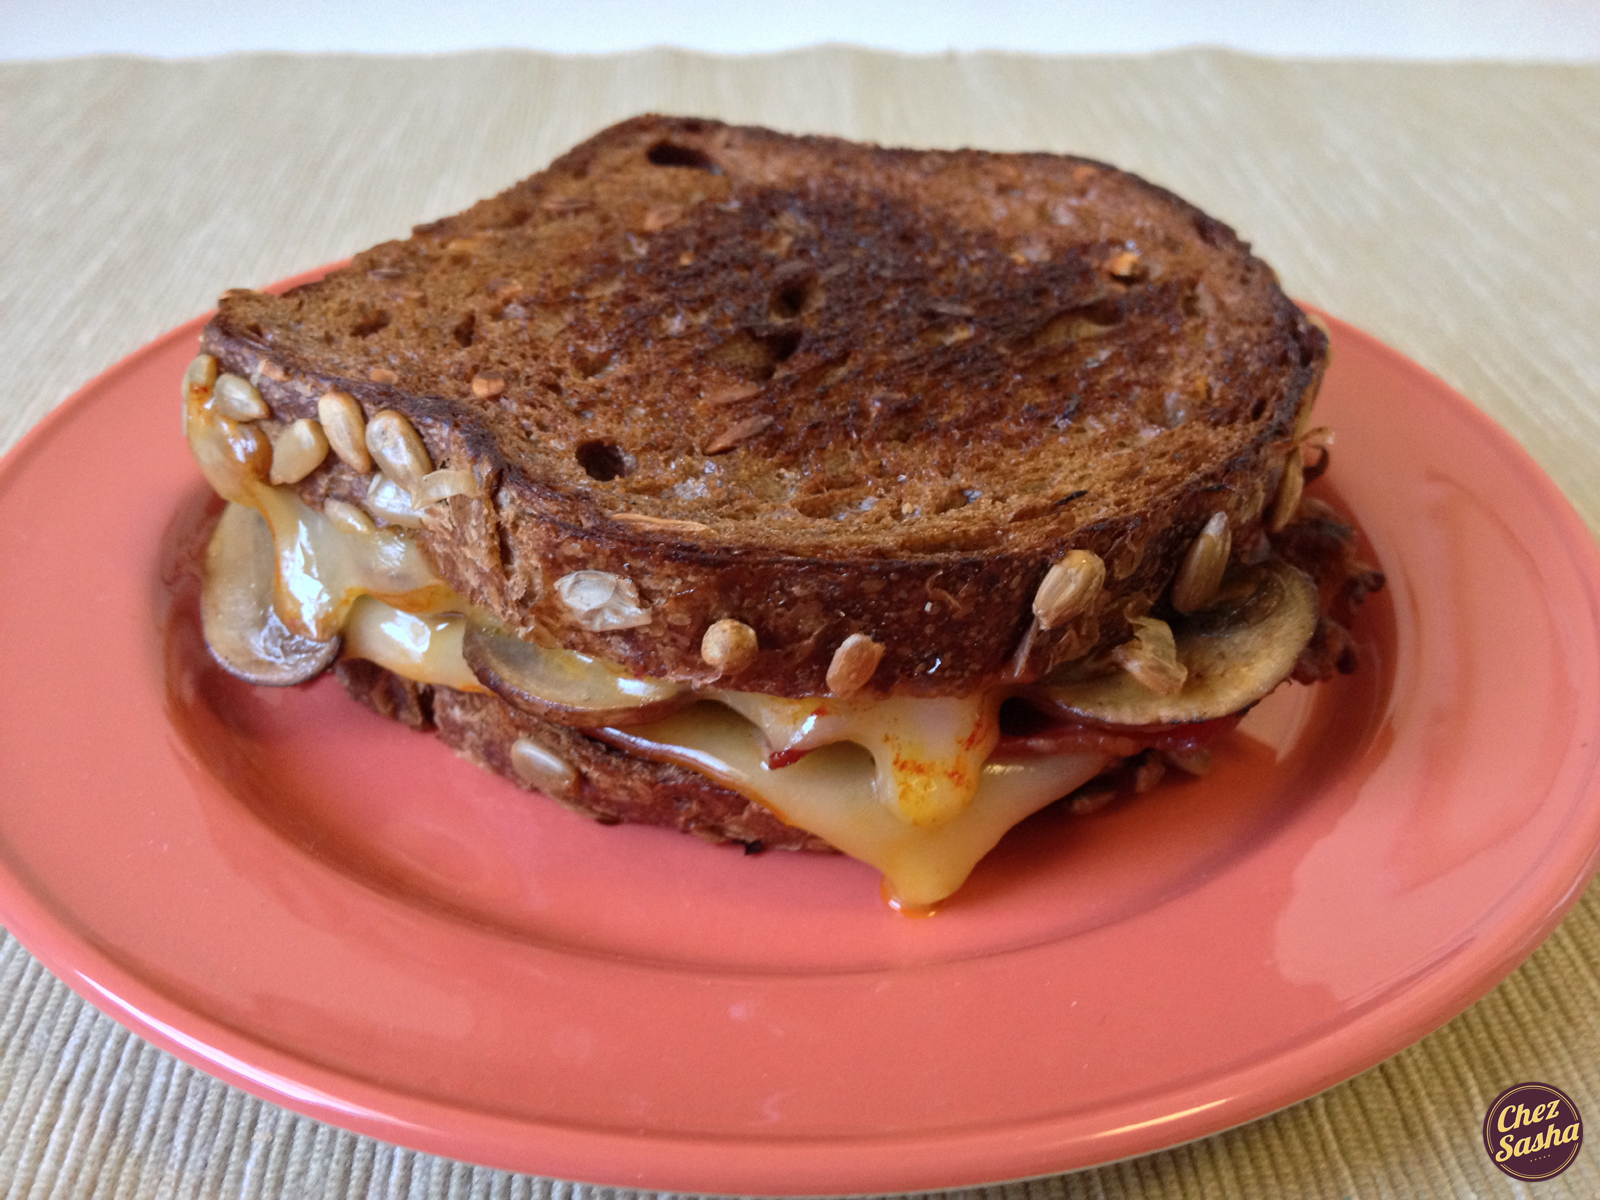
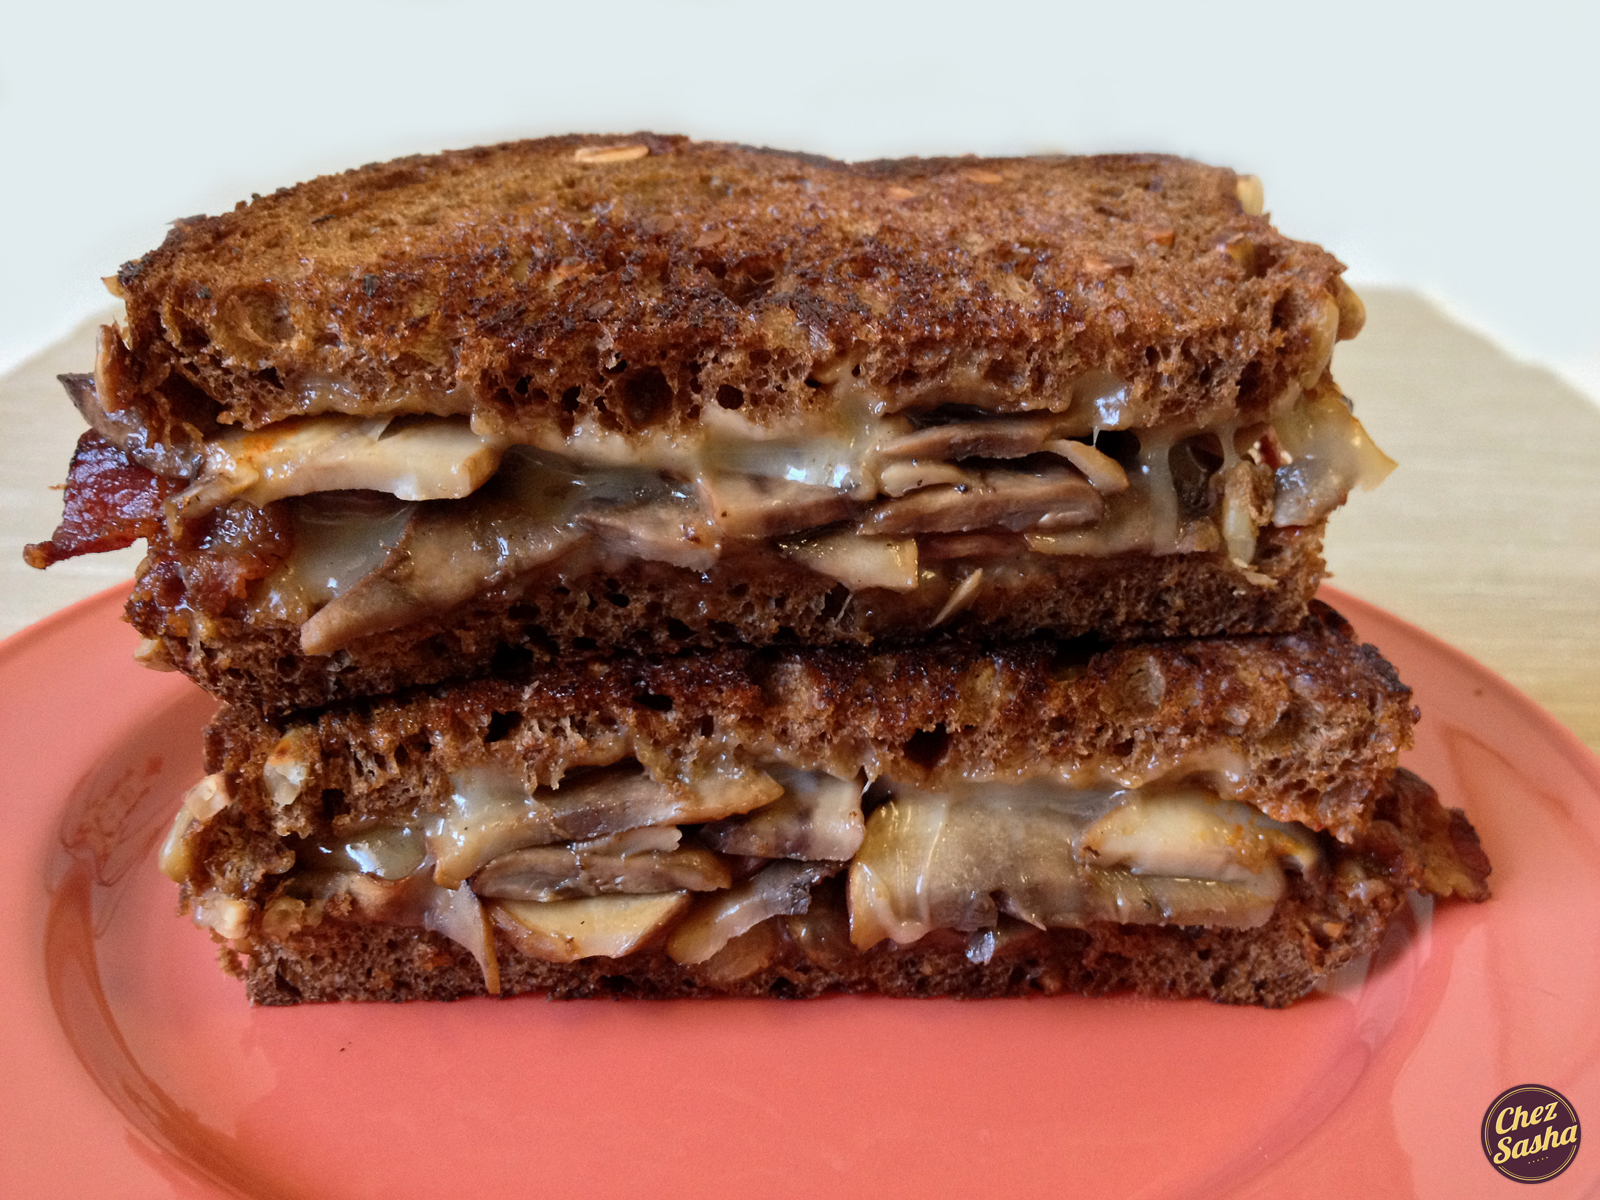
So why am I talking about pizza in a grilled cheese post? Well, back then, I would have said that grilled cheese - like pizza - is not broken, so why fix it? The Wonderbread-Kraft version is just fine. But because I am now older and a tad wiser, I see that there’s nothing wrong with enhancing a classic food. It is simply a variation on the theme - the cheesy, crispy, comforting theme.
(Yield: 1 sandwich)
Ingredients:
2 strips bacon
3-4 baby bella mushrooms, thinly sliced
2 slices Muenster cheese
2 slices pumpernickel bread
1 tsp butter, at room temp
Procedure: Place bacon into skillet and turn on a medium flame. Cook, flipping once halfway, for about 5 min or until sufficiently crispy. Remove bacon and drain on a paper towel. Discard some of the bacon grease, leaving about 1 tbsp of it in the skillet. Return the skillet to medium heat. Add mushrooms and cook, stirring occasionally, until browned - 4-5 min. Then butter one side of each bread slice and place buttered-side down. Place a slice of cheese, the mushrooms, bacon and more cheese on one slice (in that order) and cover with the other bread slice. Place sandwich into the same skillet over medium-low heat and cook for 3-4 min per side, occasionally pressing down on the sandwich with a spatula.
Do you feel that your palate has matured through the years?
What did you hate eating as a child that you love eating now?
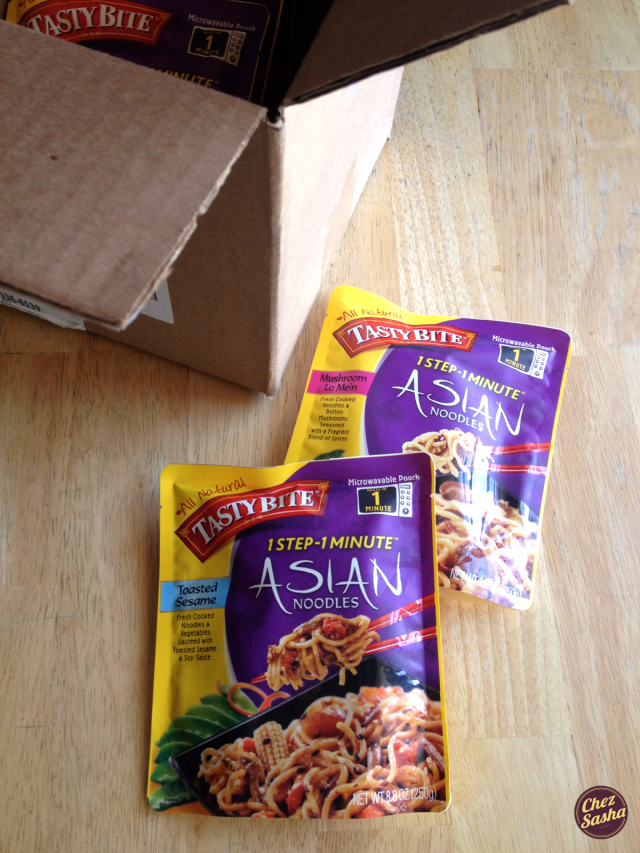
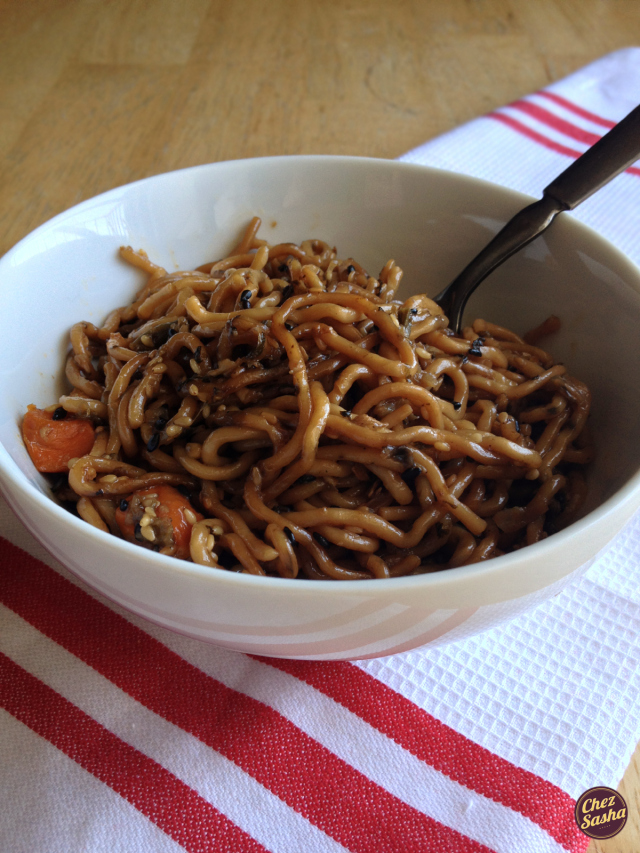
When I was offered to review the Asian noodle dishes by Tasty Bite, my first thought was, “Yuck! A sodium and chemical heavy, overly processed product that barely resembles food? No, thank you.” But before writing it off completely, I decided to browse their website, which pleasantly surprised me and changed my mind. I learned that Tasty Bite has been around since 1995, and their current inventory includes dozens of Indian and pan-Asian products. While their products require no cooking or refrigeration, they are preservative and MSG-free, not to mention vegan and kosher. The secret is in the package: the food is first prepared and placed into retort pouches (the material used for space food); it is then sealed and cooked under high pressure, which sterilizes it and keeps it fresh for 18 months. To reheat a meal, you simply place it in the microwave or a pot of boiling water for one minute. That’s it!
When my package of samples arrived, the first thing I did was read the ingredient list and I was happy to learn that there was indeed nothing but noodles, vegetables and spices in the meals. Taste-wise, the noodles did not disappoint either. The noodles are savory and satisfying and do not lend themselves to any of that guilt that comes along with eating take-out or a frozen dinner.
Although nothing can replace a homemade meal, the Tasty Bite products are perfect for when you need to work through lunch or when you simply don’t feel like cooking dinner. They’re also easy on the wallet, coming in at less than $4 per meal.
Check out their website for more information and to locate a retailer near you.
Lately, I’ve been trying to think of ways to enhance my blog content. I want to challenge myself - to broaden my cooking horizons, if you will - and I want you, my readers, to have something to look forward to. (Way back when, I had a short stint with soups but quickly grew sick of making them, especially since I insisted on posting one recipe each week). The answer came to me in a rather organic way and it excited me much more than soup. I love sandwiches and chances are you love sandwiches, so why not write about some fricken’ sandwiches?!
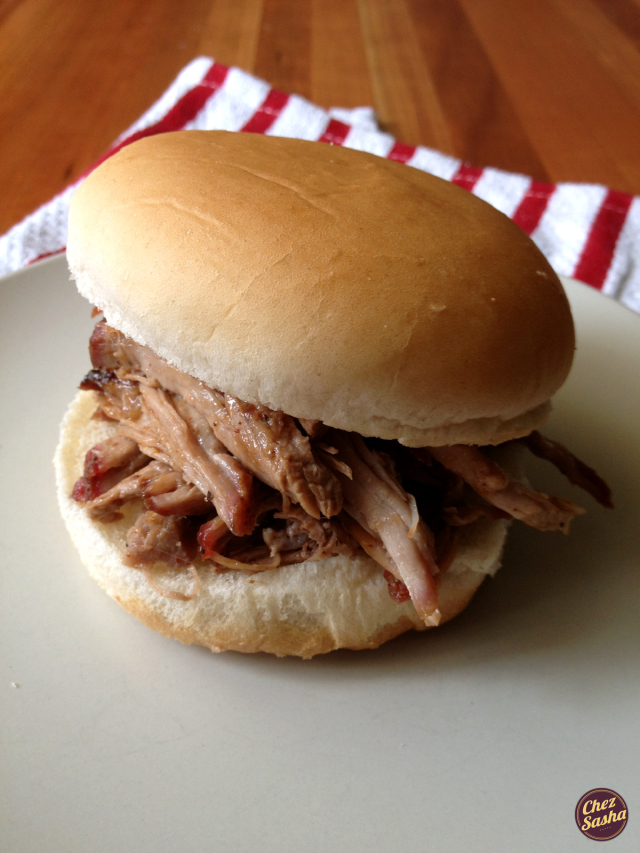
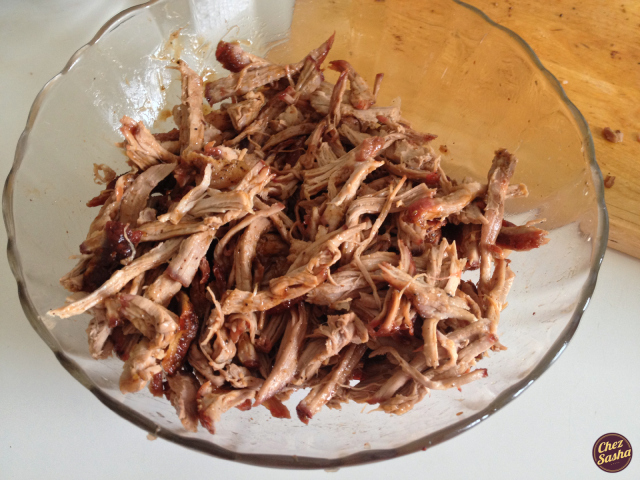
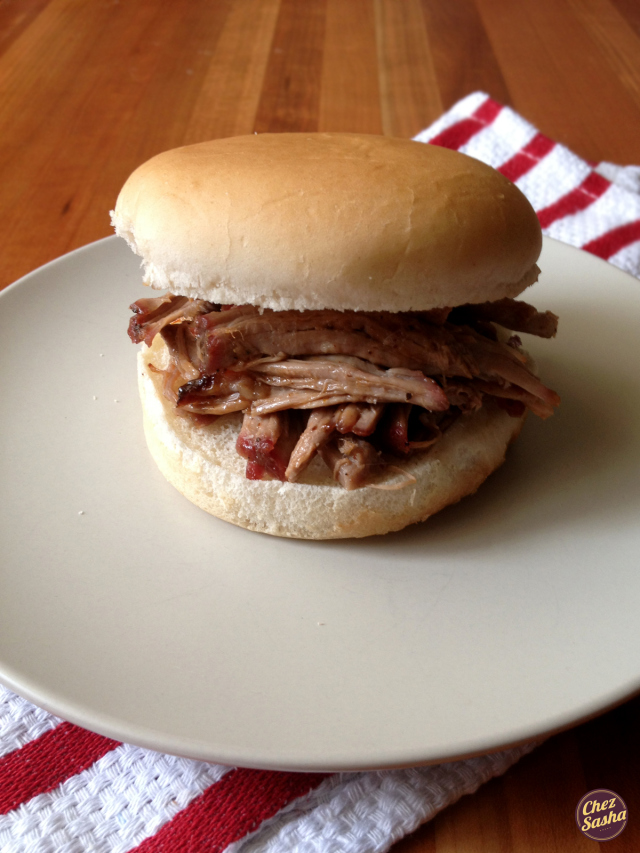
Pulled pork has been on my “recipes to try” list for several years now. Seriously. I put it there because it is one of my very favorite foods ever, but it has remained there so long for two reasons. The first being that every recipe I seemed to come across called for a slow cooker, which I don’t have. The second being pure fear. Because I love it so, I was afraid to mess it up and be forever disappointed in myself (I do not take failure lightly). But alas, a ray of hope appeared, by the name of Melissa Clark, no less. A few weeks ago, a recipe and video for pulled pork was featured on the New York Times’ Diner’s Journal blog. Clark made it look for easy and delicious, and I just knew my time had come. And the best part - no slow cooker needed!
Inspired by this Melissa Clark recipe from The New York Times
(Yield: 6 sandwiches)
Ingredients:
2 lb pork butt
Store-bought barbecue sauce
6 hamburger buns or potato rolls
Dry rub:
2 tbsp brown sugar
1 tsp chili powder
1 tsp garlic powder
1 tsp freshly ground black pepper
3/4 tsp cumin seeds
1 1/2 tsp kosher salt
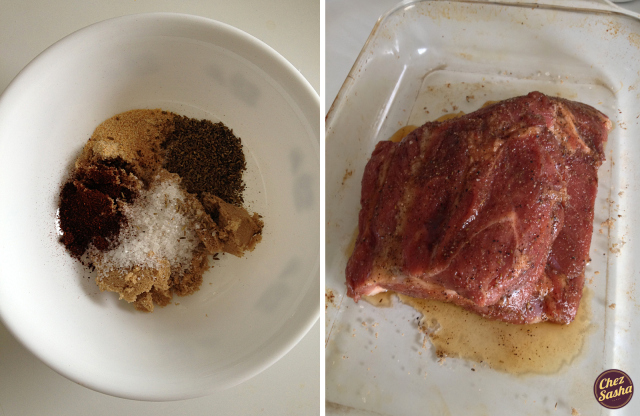
Procedure: Rinse pork, pat dry with paper towels and place into a roasting pan. In a small bowl, combine the dry rub ingredients. Massage the meat generously with dry rub and let stand at room temperature for one hour.
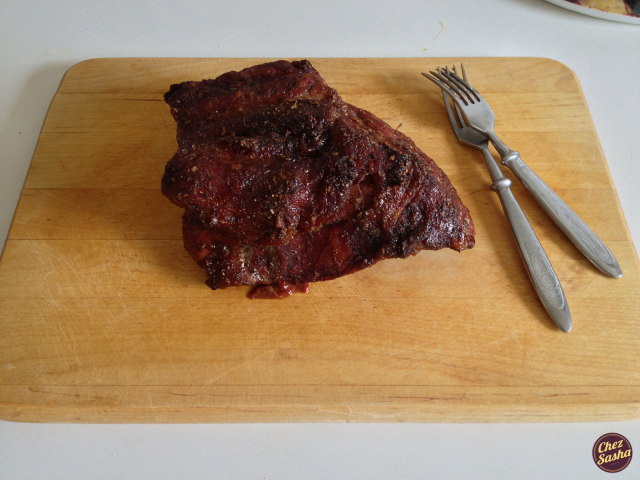
Heat oven to 300F and roast pork for 3 hours. Remove from oven. When the meat is cool enough to handle yet still warm, shred it using two forks or your fingertips.
Toss the pulled pork with about 1/2 cup (or more if desired) of your favorite barbecue sauce.
Divide the meat evenly amongst the rolls and serve immediately.
For a short time in the beginning of high school, when I started to care what I looked like, I had a love-hate relationship with food. I loved food but hated calories. I wasn’t technically overweight but I wanted to be skinny.
I never reached the point of an eating disorder, but do remember feeling guilty after most meals, even if they weren’t particularly indulgent. I pored over photos of Victoria’s Secret models, hoping that if I could just ingrain their forms into my brain, I too would be a size 0; I attempted skipping meals and opted for coffee, water or gum instead; I worked out obsessively and even had a phase where I would write down everything I ate each day, thinking it would curb my appetite. The craziness took some time to get over but eventually I realized that what I was doing wasn’t healthy and that I wasn’t any happier doing it. I realized that there was nothing shameful about eating and learned to control myself and to love food while eating healthy.
Here are some rules I’ve been adhering to since that phase ended:
1.) Don’t drink your calories: Soda, processed juices and other sugary drinks are enemy number one. Processed sugar, especially in liquid form, has zero nutritional value and only means one thing - weight gain. Yes, if you’re a daily soda drinker, it may be hard to quit cold turkey but try to slowly wean yourself off of it. Drink water with lemon or unsweetened green tea instead. Adding more water into your diet will speed up your metabolism and cleanse your blood as well as your skin. And don’t try to take the diet soda route, either. The sugar substitute used to sweeten diet drinks is associated with risks way worse than a few extra pounds.
2.) Fruits and vegetables: Eat them. A healthy diet consists of 50-60% fruits and vegetables, since they provide most essential vitamins and minerals. And if you choose to cook your vegetables, do so minimally. If a vegetable doesn’t retain it’s natural crunch after cooking, you can be sure you’ve gotten rid of all the good stuff in them. Recommended cooking methods include blanching, steaming, sauteing and roasting. Also, always keep some washed and prepped greens on hand. Green foods are super healthy so try to sneak some kale, spinach or arugula into every sandwich, soup, pasta dish and, of course, salad.
3.) Keep healthy options at eye-level: Reorganize your fridge and cabinets so that when you open them, the first foods you see are not guilt-inducing - and by these I mean fruits and vegetables, lean proteins like hummus and Greek yogurt, whole wheat crackers and granola bars, etc. If you see them first, you are more likely to eat them.
4.) Don’t buy junk food: This may seem kind of obvious and redundant but it is not. When shopping for groceries, just skip the cookie, chips, cake and soda aisles. If there is no junk food around, you won’t eat it. It’s that simple.
5.) Come to work prepared: And I don’t mean with a PowerPoint presentation. Most people spend most of their waking hours at work, which means that most of their meals are had at their desks. To avoid trips to the vending machine or pizza parlor, keep a few healthy options at work at all times.
6.) Limit your meat intake: Carnivores are used to thinking that each meal needs to revolve around an animal protein, but it is just not so. Eating meat a few times a week or once a day will provide sufficient nutrition. It’s an arduous task for the human body to digest meat (ever wonder why you get sleepy after a meat-heavy meal?) so it’s best to skip it most of the time. As for all those other meals, substitute with non-animal proteins, like beans, chick peas and lentils.
7.) Moderate, not eliminate: I would never tell you to cut doughnuts, burgers, creamy pastas or other soul foods out of your diet. However, these delicious foods ought to reserved for special occasions and enjoyed in moderation. If a colleague brings in doughnuts from your favorite shop, have one, not three. If you plan to go out for pizza with friends on Sunday night, eat light throughout the day in preparation, and so on.
8.) Don’t eat in front of the TV: Studies show that hunger, appetite and consciousness are closely intertwined. If you’re eating with your mouth and concentrating on the TV with your mind, that fact that you’ve just eaten will not register in your head so you’ll still feel hungry after a meal. Don’t check your smartphone or computer either, and I guarantee you will eat less.
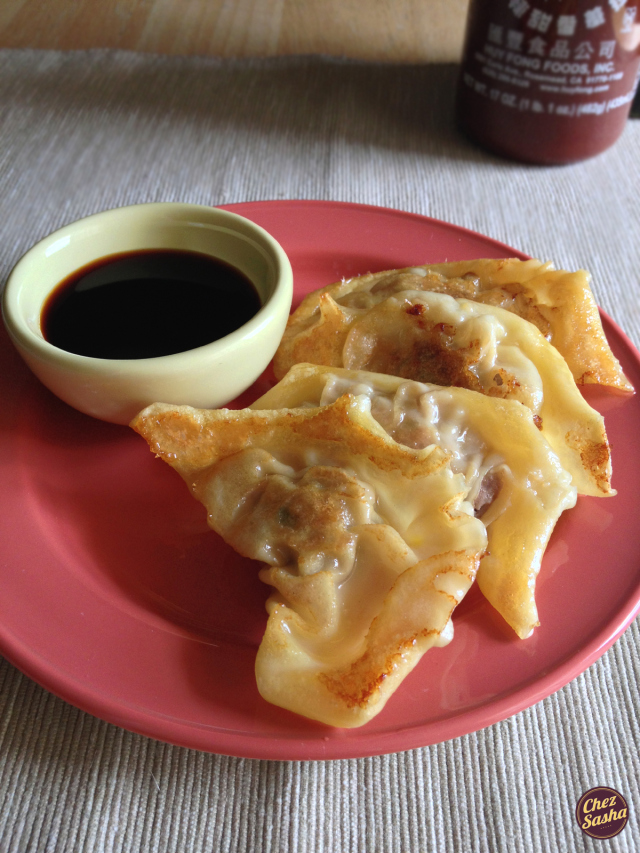
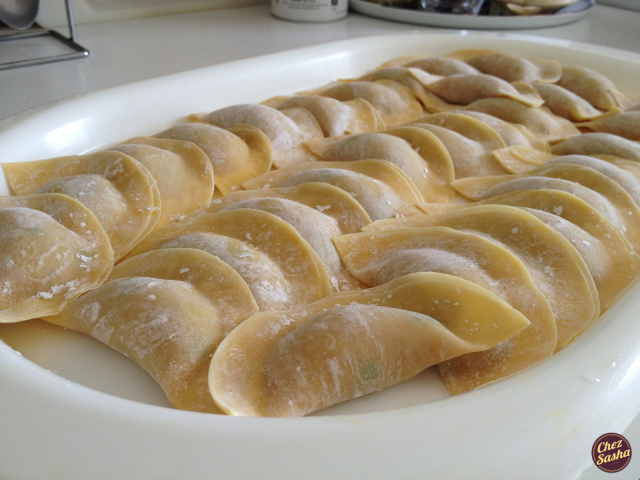
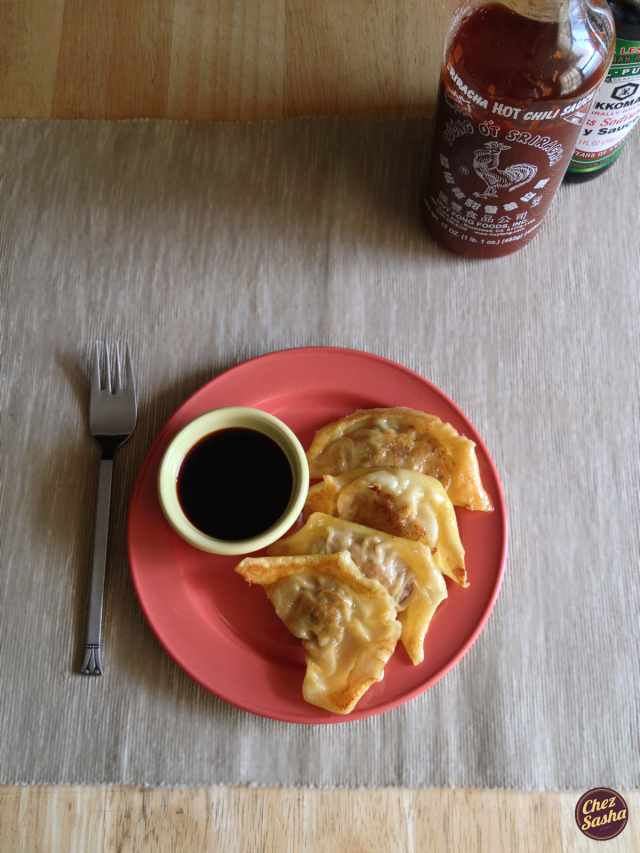
I find any food that’s comprised of dough stuffed with meat - be it a pork bun, wonton or Russian pirozhok (chewy yeast dough stuffed with minced meat and deep-fried) - irresistible. Foods like this allow you to have your protein and starch in one bite and I’m all about that efficiency. I wonder who was first to try this cooking technique because frankly, she/he deserves a monument.
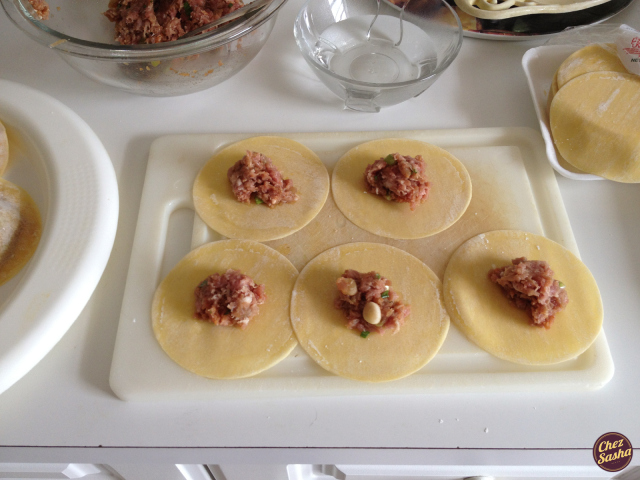
Store-bought dumpling skins and a few pantry staples make this recipe a breeze. If you have kids, feel free to recruit them to help fill the potstickers.
(Yield: 30 dumplings)
Ingredients:
2 scallions, chopped
1 tbsp sesame oil
2 tbsp soy sauce
1 tsp sriracha sauce (optional)
1 garlic clove, crushed
A pinch of salt
1 lb ground pork
About 30 store-bought dumpling skins
Vegetable oil
Procedure: In a large bowl, combine the first six ingredients. Stir and add pork. Using your hands, gently mix all the ingredients until homogenous. Do not over-mix. To form a dumpling, place skin on a flat surface and add a heaping teaspoon of filling into the center. Dip an index finger into water and moisten half of the circumference of the dumpling skin (like a half moon). Then fold over and seal edges, making sure to seal out all air from the dumpling.
Repeat with remaining ingredients.
To cook, heat a large non-stick skillet over medium heat. Add enough vegetable oil to cover the bottom. Place 6-8 dumplings into skillet at once - do not overcrowd the pan. Fry 1-2 min, until dumplings are starting to brown. Then add about 1/4 c water into skillet, reduce heat to low and cover tightly with a lid. Let steam for about 5 min. When the water is almost entirely evaporated, remove lid and turn heat back up to medium. Cook 1-2 extra minutes, until the bottoms are brown. Remove dumplings from skillet and repeat with remaining pieces. Serve immediately.
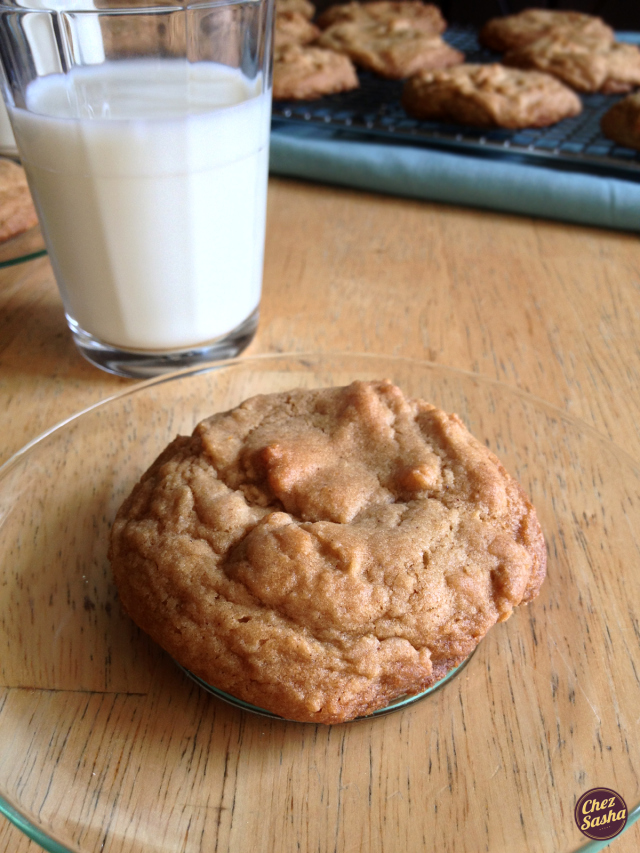
When I was a kid, my mom baked all the time. There were layered cakes, crispy cookies, sweet breads to accompany our tea, and so much more. But when I watched her bake, I never once saw her measure an ingredient; we didn’t even own measuring cups or a scale. She would just scoop ingredients into a bowl with a little ceramic teacup, stir them whilst balancing the bowl between her hip and forearm, put whatever it was into the oven, and soon, the heavenly scent alone would leave us speechless and drooling. I don’t remember her ever messing up a dessert so I just assumed she was a sort of magician with a sixth sense.
So, when I started baking, I didn’t take measuring seriously, especially since I’ve been cooking for a while already and had gotten used to eyeballing ingredients. I took recipes and directions like, “butter, at room temperature” and “gradually add flour” to be guidelines. I guess I thought I could outsmart recipes and if my intentions were good, the dessert would somehow just work out. But unsurprisingly, it didn’t. I couldn’t make a single edible cookie for a long time. I remember how my mom would stand next to me, scraping the burnt bottoms of cookies with a butter knife after yet another failed attempt, comforting me and saying that next time I would certainly do better.
It wasn’t until I started reading and re-reading the recipe before baking and following measurements and directions exactly that anything worked out. I learned that if a lemon bars were advised to be cooled before being cut, I should do just that, and that if a recipe calls for brown sugar, substituting with white just won’t do. It is now that I realize that despite how amazing my mother is, she is no magician. She’s just made so many cakes and cookies by the time she had me, that baking became second nature to her - she, as they say, just felt it.
Whereas cooking is about intuition, instinct and pleasure, it is careful attention, precision and patience that matter most in baking. I’ve still a long way to go until I can flawlessly frost a cake, but these cookies (and these!) are proof that I have finally mastered at least one type of dessert.
This recipe from Epicurious is incredible. The cookies are quick to prepare and bake, and they don’t dry out, even days after baking. They’re soft, chewy, fragrant and ideal for minimalist dessert lovers like myself. I strongly advise you to make them!
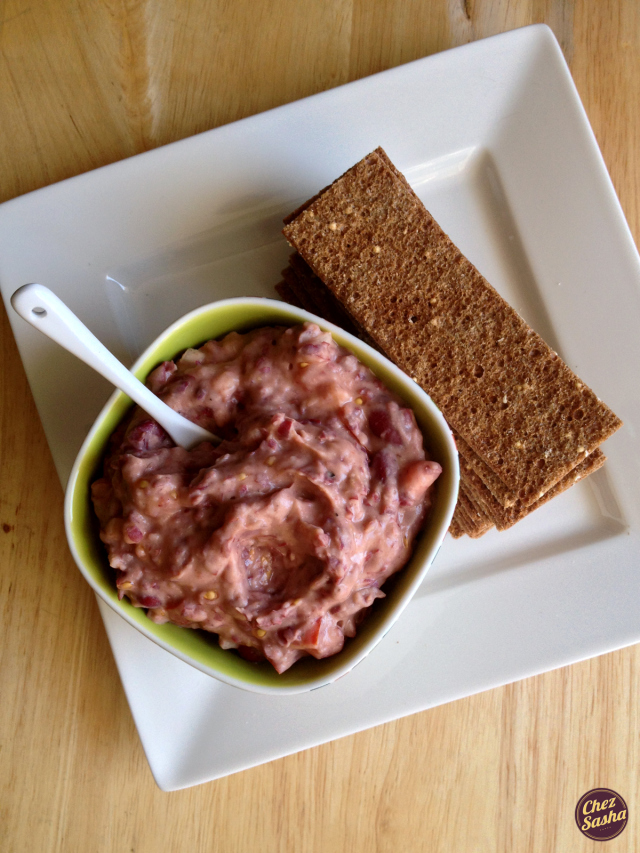
Almost exactly three years ago, I posted a recipe for roasted garlic white bean dip. That dip is not unlike hummus except that hummus calls for chick peas instead of beans. Last week, I was craving that dip again but wanted to change things up. I added tomatoes for tang and sriracha for heat, and thus, this fragrant, irresistible hors d’oeuvre was born. I’m not going to go as far as saying that this recipe will replace guacamole in your party snack repertoire but it will certainly make a valiant try. And I assure you, no one will even miss that green standby if you serve this.
The best part is, served alongside some Finn Crisps, this is a healthy vegan snack, full of fiber, protein and other essential nutrients.
(Yield: 1 bowl will serve about 4 people)
Ingredients:
1 15 oz can kidney beans, drained and rinsed
1 head of garlic, roasted*
3/4 tsp sriracha
2 tbsp extra virgin olive oil, divide
1/2 c finely diced tomatoes
1 tbsp finely chopped shallot (red onion also ok)
Salt + pepper
*How to roast garlic: Heat oven to 400F. Peel the papery outer layer of garlic head, leaving the cloves intact. Cut off 1/3″ off the top of the head and discard, exposing the flesh of the cloves. Drizzle with 1 tbsp of oil, and using your hands, coat the head evenly. Wrap in foil and roast for 35 min. Cool completely before handling.
Procedure: Squeeze garlic cloves out of the head and add to food processor along with 2/3 of beans (reserve 1/3 beans for later). Puree. With the motor running, add sriracha and oil. When fully incorporated, stop motor and remove the blade. Using a spoon, stir in tomatoes, shallot and remaining beans. Add salt and pepper to taste.