What to do with frozen peas

We all have that sad, lonely, dejected bag of peas in the freezer, right? They’re right next to that half-empty pint of rainbow sorbet from two summers ago. We buy the peas with good intent but somehow the damn things always get overshadowed by pasta, chicken or even canned tuna - basically any other kitchen staple that’s not peas. As far as I’m concerned, their only real purpose is as an ice pack, for handsome men like Ryan Gosling who happen to have been punched in the face. I mean, we could just add them to our soups, stews, rice, etc. but we forget they’re even there.

Garlic peas (2) copy

Below is a recipe for what to do with a large quantity of peas that’s so easy, it literally consists of three ingredients (not counting salt and pepper). The peas turn out flavorful and dare I say desirable, and make a fantastic side dish for just about anything.

Sauteed Garlic Peas

(Yield: 4-6 servings)

Ingredients:

2 tbsp extra virgin olive oil

3 garlic cloves, thinly sliced

2 c frozen green peas

A pinch of salt and freshly grated black pepper

Procedure: Heat the oil in a large, high-sided skillet over medium-low heat. Add garlic and saute for 1 min, just until fragrant. Add peas, stir and cook until softened and warmed through, stirring frequently, 7-8 min. Taste and re-season if necessary. Serve hot or at room temperature.

Garlic peas (16) copy

How do you like to use frozen peas?

Chick pea, tomato and basil pasta

I’m not gonna bore you with the story of how I came up with this recipe or go on and on about how easy it is to make. I’m also not gonna tell you that tomatoes and basil are a fail-proof flavor combo (duh) or that chick peas boast quite an impressive nutrition panel. I will, however, tell you that chick peas make this sauce sinfully rich without any help from our good friends butter and heavy cream. And, I will also gonna strongly suggest that you make it. ASAP.

Chick pea and tomato pasta

(Yield: 4-6 servings)

Ingredients:

3 tbsp extra virgin olive oil

3 garlic cloves, thinly sliced

1 small onion, diced

1 15 oz can tomato sauce

1 20 oz can chickpeas, drained and rinsed

1 tsp dried oregano

Salt + pepper

1 tsp sugar

1/2 c basil leaves, gently torn

1 lb penne or another short cut pasta, cooked just short of al dente

Parmesan cheese for garnish (if desired)

Procedure: Divide chick peas in half. Puree one half using a potato masher or food processor. Set all chick peas aside. Heat olive oil in large saute pan or high-sided skillet over medium-low heat. Add garlic and cook for 1 min until fragrant. Add onion with a pinch of salt and cook until soft and translucent, stirring frequently, about 5 min. Then add chick peas, tomato cause, oregano, a pinch of salt and pepper and sugar. Stir and bring to a simmer. Cover and cook for 10 min, stirring occasionally. Then turn the heat off and stir in basil leaves (if not serving immediately, hold off on adding basil until right before serving).

Chick pea and tomato pasta

Combine sauce with pasta; taste and re-season if necessary.

Chick pea and tomato pasta

Ponchiki (Russian doughnut holes)

We all have food memories that we may have fabricated, right? They are blurry, gray, distant and vague; they are memories of us eating something not necessarily good or bad, but an imprint of them has remained in the brain nonetheless. Years down the line we try to look back to those memories and there is but a hint of them left - nothing to actually hold on to. Let us refer to those as phantom food memories.

Ponchiki

I don’t remember eating ponchiki (pon-chee-key) often as a child. My mom might have made them for my sister and I once or twice but it wasn’t a regular thing - cuz, you know, deep-fried dough isn’t really good for kids. I don’t even remember what they tasted like to me as a child, but I do remember being excited about eating them. And so, since I’ve been meaning to try making doughnuts at home for a long time now, I figured I’d ask my mom about this phantom recipe as a start. To my pleasant surprise, she practically knew it by heart and it turned out to be super easy, too. No fancy equipment, yeast, or proofing time required! Eating the final product, unfortunately, did not force those memories to float to the surface. But eh, who cares - they were freakin’ delicious!

Ponchiki

(Yield: about 12 ponchiki)

Ingredients:

250 g (1 c plus 1 tbsp) farmer’s cheese

1/2 c sugar

2 eggs

1 tsp vanilla extract

1/3 tsp lemon zest

1 tsp baking soda

1 tsp lemon juice

1 1/4 c all-purpose flour (plus more for dusting)

Vegetable oil for frying

Powdered sugar for dusting

Procedure: Combine cheese, sugar, eggs, vanilla and zest in a mixing bowl. Then squirt lemon juice into baking soda, let it fizzle for a few seconds, and add to mixture. Stir mixture until fully combined. Stir in 1 c flour - don’t overmix. The mixture should be slightly sticky and soft; if at this point the mixture is too thin, add another 1/4 c flour, or more if necessary to achieve desired consistency. Then pour oil into pot or saute pan - the oil should be about 3 inches deep. Place over high heat. Heat oil until it starts to gently ripple - about 10 min.

While the oil heats up, form the ponchiki. Place about a third of the dough on a generously floured surface. Sprinkle top with more flour and form into a log.

Ponchiki

Cut the log into 3 or 4 pieces.

Ponchiki

Shape into golf ball-sized pieces (as you would with meatballs). If dough is too sticky, sprinkle some more flour on it.

Ponchiki (19) '

When oil is hot enough, turn heat down to low. Add 3 or 4 ponchiki into the oil at a time - they should sizzle and rise to the top immediately. Cook each batch for about 5 min, turning occasionally to ensure even cooking. The ponchiki will puff up as they cook.

Ponchiki

Using a slotted spoon or other straining utensil, remove ponchiki from hot oil and drain on paper towels. Repeat with remaining ponchiki.

Ponchiki

Dust with powdered sugar. Serve warm, alongside preserves or this homemade strawberry sauce.

Ponchiki

What are your phantom food memories?

Beef and muenster empanadas

So it appears that this is my second post in a row in which I’m being the “My boyfriend and I this…” and “My boyfriend and I that…” girl. I know that this can be a little irritating to you, my dear readers, and I hate to do that to you, but there is just no way I can avoid mentioning Rene in this post. You see, empanadas are kind of a special thing for us.

Beef and muenster empanadas  (6) copy

There is a little place by Rene’s house in Brooklyn called Fiesta Chicken that sells rotisserie chicken and other specialties from the Dominican Republic. Probably more often that we should, we stop by this place on the way home to pick up the succulent chicken, yellow rice and beans, and our favorite, beef empanadas. All this food ends up weighing like five pounds and costs only about $10. The woman who works the counter knows us by now - she always smiles when we walk in and sometimes gives us little extras, like a salad or something. We take the food home, get into our pajamas, and eat it on the floor. Not because there’s no table, but because that’s just the way we like to do it. It’s not glamorous, but it is satisfying and so, so delicious. We always eat inhale the empanadas first. Again, they’re not gourmet or anything, but they are crispy, meaty and warm, which is exactly what we crave at the end of the day. Every time we eat them, we say “We have to try making these!” And last weekend, we finally got around to it.
Beef and muenster empanadas  (29) copy

(Yield: 1 dozen pastries)

Ingredients:

Dough recipe adapted from Alejandra Ramos

6 oz cream cheese, at room temp
6 oz unsalted butter, at room temp
2 c minus two tbsp all-purpose flour
3/4 tsp salt

Filling:

1 tbsp vegetable oil
1 large yellow onion, diced
1 lb ground beef
3 garlic cloves, minced
1 tsp cumin
1 tsp dried cilantro
1 tsp paprika
3/4 tsp cayenne pepper
4 oz canned tomato sauce
Salt and freshly ground black pepper
About 4 oz muenster cheese, sliced or shredded

Plus:

Extra flour for dusting
1 egg, beaten
1 tbsp water
Sour cream, if desired

Beef and muenster empanadas  (25) copy

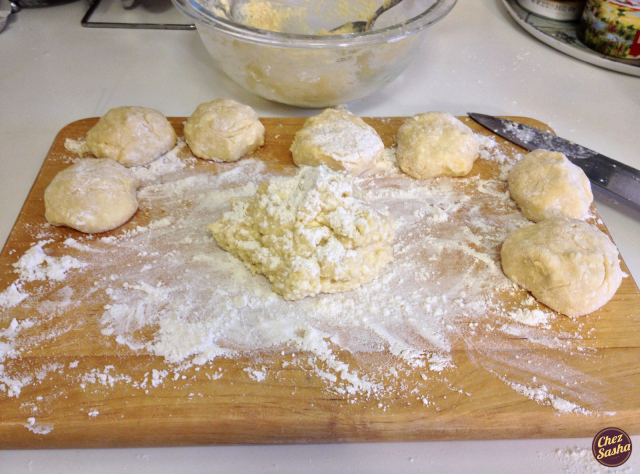
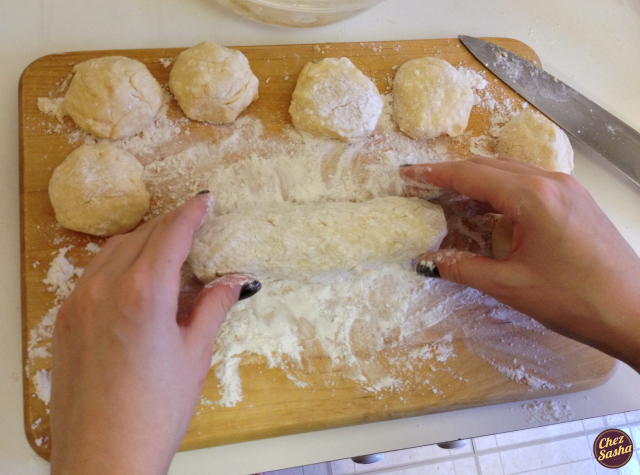
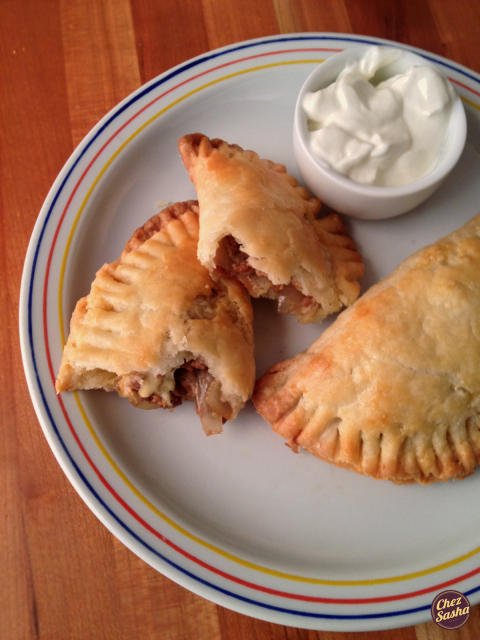
Procedure: First make the dough. Beat cream cheese and butter in a mixer or food processor on high until smooth and creamy. Switch speed to low and add flour slowly until completely combined. Remove dough from bowl and shape into a ball. Cover with plastic wrap and refrigerate for one hour (can be made ahead up to 48 hours). While dough chills, prepare the filling. Heat the oil in a large skillet over a medium flame. Add onion with a pinch of salt and cook until softened, about 4 min, stirring occasionally. Add garlic and cook another minute. Then add beef with 1/2 tsp of salt and all the other spices. Break up beef with a wooden spatula and cook, stirring occasionally, until browned, for about 7 min. Add tomato sauce and cook for another minute. Turn heat off, taste and re-season if necessary. Let the filling come to room temperature before making pastries.

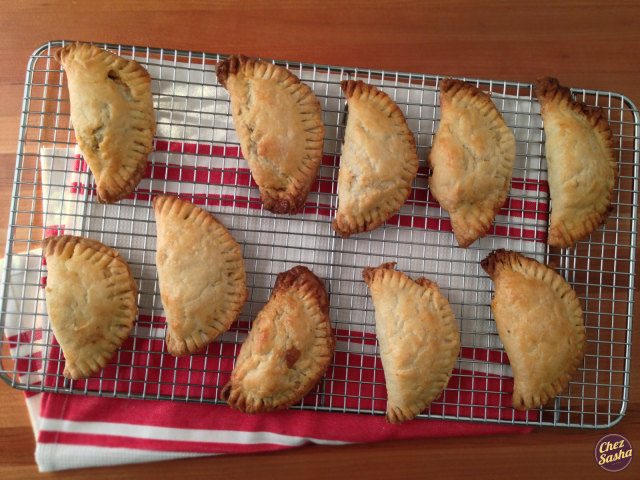
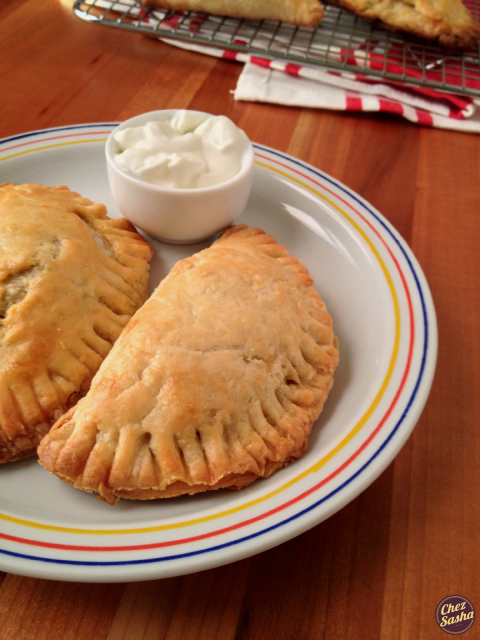
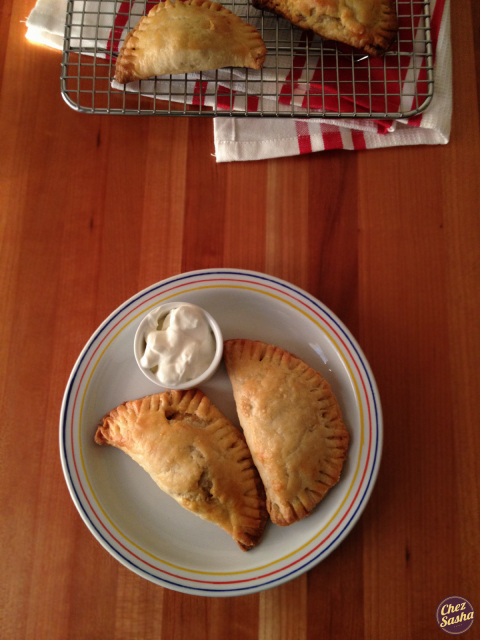
Preheat oven to 350F. Line a baking sheet with parchment paper or foil. Remove dough from the fridge and let it rest at room temp for 2 min. (Separate ball into 2 pieces, if desired). Dust your counter and rolling pin with flour, and roll out dough to 1/6″-thickness. Use a 4″ round cutter or upturned bowl to cut out circles, rerolling and cutting any remaining scraps. Fill each circle with about 2 tbsp of filling and top with cheese. Fold over and crimp and seal edges, using a fork. Place on baking sheet and repeat with remaining dough. In a bowl, whisk together egg and water, and brush tops of pastries with egg wash. Bake for 20-25 min, until empanadas are golden brown. Serve hot, with sour cream if desired.

Beef and muenster empanadas  (50) copy

Do you have any strange yet comforting food traditions?

Any ideas for intesting empanada fillings?