Ponchiki (Russian doughnut holes)

We all have food memories that we may have fabricated, right? They are blurry, gray, distant and vague; they are memories of us eating something not necessarily good or bad, but an imprint of them has remained in the brain nonetheless. Years down the line we try to look back to those memories and there is but a hint of them left – nothing to actually hold on to. Let us refer to those as phantom food memories.

Ponchiki

I don’t remember eating ponchiki (pon-chee-key) often as a child. My mom might have made them for my sister and I once or twice but it wasn’t a regular thing – cuz, you know, deep-fried dough isn’t really good for kids. I don’t even remember what they tasted like to me as a child, but I do remember being excited about eating them. And so, since I’ve been meaning to try making doughnuts at home for a long time now, I figured I’d ask my mom about this phantom recipe as a start. To my pleasant surprise, she practically knew it by heart and it turned out to be super easy, too. No fancy equipment, yeast, or proofing time required! Eating the final product, unfortunately, did not force those memories to float to the surface. But eh, who cares – they were freakin’ delicious!

Ponchiki

(Yield: about 12 ponchiki)

Ingredients:

250 g (1 c plus 1 tbsp) farmer’s cheese

1/2 c sugar

2 eggs

1 tsp vanilla extract

1/3 tsp lemon zest

1 tsp baking soda

1 tsp lemon juice

1 1/4 c all-purpose flour (plus more for dusting)

Vegetable oil for frying

Powdered sugar for dusting

Procedure: Combine cheese, sugar, eggs, vanilla and zest in a mixing bowl. Then squirt lemon juice into baking soda, let it fizzle for a few seconds, and add to mixture. Stir mixture until fully combined. Stir in 1 c flour – don’t overmix. The mixture should be slightly sticky and soft; if at this point the mixture is too thin, add another 1/4 c flour, or more if necessary to achieve desired consistency. Then pour oil into pot or saute pan – the oil should be about 3 inches deep. Place over high heat. Heat oil until it starts to gently ripple – about 10 min.

While the oil heats up, form the ponchiki. Place about a third of the dough on a generously floured surface. Sprinkle top with more flour and form into a log.

Ponchiki

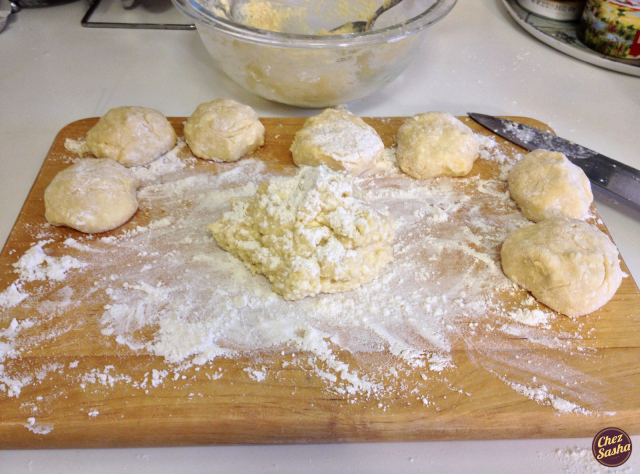
Cut the log into 3 or 4 pieces.

Ponchiki

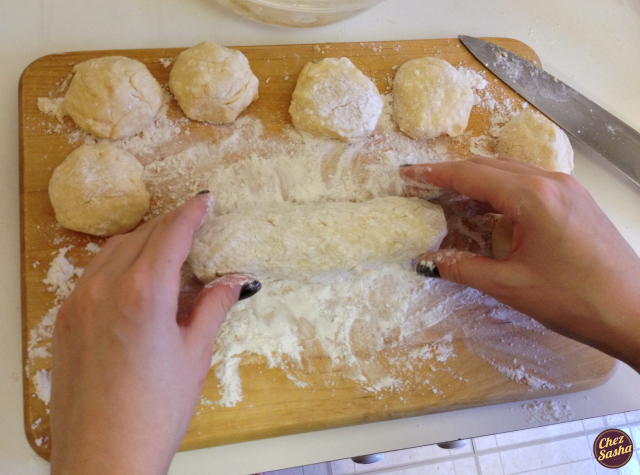
Shape into golf ball-sized pieces (as you would with meatballs). If dough is too sticky, sprinkle some more flour on it.

Ponchiki (19) '

When oil is hot enough, turn heat down to low. Add 3 or 4 ponchiki into the oil at a time – they should sizzle and rise to the top immediately. Cook each batch for about 5 min, turning occasionally to ensure even cooking. The ponchiki will puff up as they cook.

Ponchiki

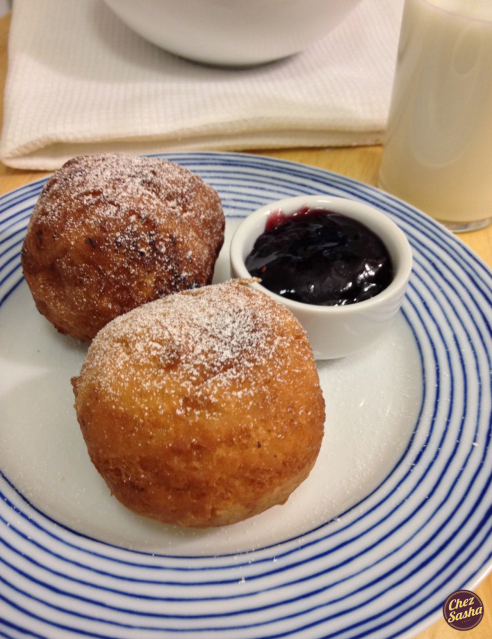
Using a slotted spoon or other straining utensil, remove ponchiki from hot oil and drain on paper towels. Repeat with remaining ponchiki.

Ponchiki

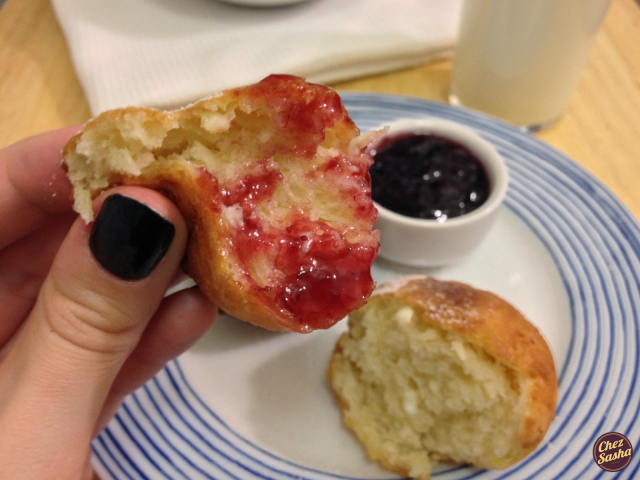
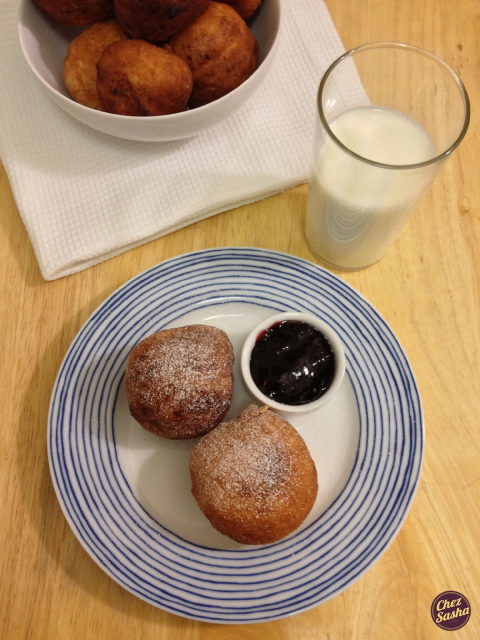
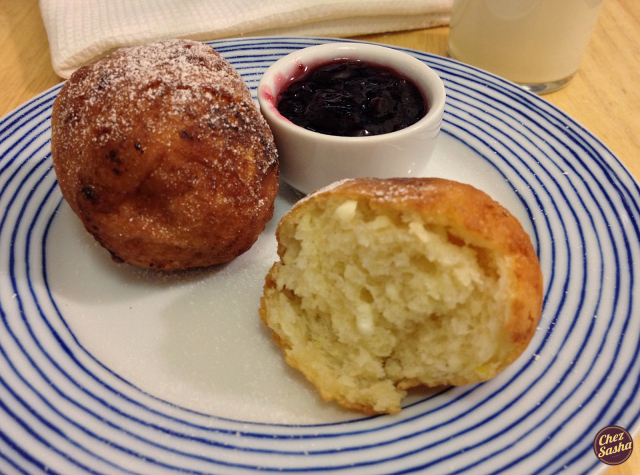
Dust with powdered sugar. Serve warm, alongside preserves or this homemade strawberry sauce.

Ponchiki

What are your phantom food memories?

Broccoli pesto pasta

Those of you who follow me on instagram might have seen a photo from this series a loooong time ago. Alas, here is the recipe.

This broccoli pesto is a tried and true recipe that both my mom and I have been making for years. The pesto is one of the few pasta accompaniments I know of that goes as well with long-cut pastas as with short-cut ones. It’s also a relatively healthy alternative to, say, a cheese sauce. And it’s vegetarian. Try it for your next pasta night! You won’t regret it – I promise.

Broccoli pesto pasta

(Yield: 6 servings)

Ingredients:

3 c broccoli florets

1 garlic clove, roughly chopped

1/2 c parmesan cheese

1/4 c olive oil

1/2 c toasted walnuts

1 tbsp lemon juice

3/4 lb pasta any kind, cooked al dente in salted water according to package directions

Salt, freshly ground black pepper

Procedure: Bring a medium pot of water to a boil.  Season with 1 tbsp of salt and add broccoli. Cook for exactly 3 min. Drain broccoli and place into food processor along with garlic and nuts. Pulse until pureed, occasionally scraping down sides. With the motor running, add lemon juice, a pinch of salt and 1/2 tsp black pepper, and stream in oil. When incorporated, remove blade and stir in cheese by hand. Taste and re-season if necessary. Combine with hot pasta and 2 tbsp of pasta cooking water. Stir until incorporated. Serve hot; garnish with more cheese if desired. (Reheat leftovers in a skillet with butter and cook with a beaten egg for a quick, carbonara-style dish).

Broccoli pesto pasta

…Is anybody out there?

I know I’ve been MIA for two weeks but I hope there are people still out there reading this. I am so glad to be back and I hope to never have to be absent for such a long time again. I won’t bore you by recounting the hellish past two weeks of schoolwork but I will tell you about two cool events that I recently attended.

A few weeks ago, I was invited to hear a talk featuring Kim Severson and Julia Moskin – both New York Times food reporters. (You may recall me extending the invite to you in this post?) The two women, who affectionately refer to each other as ‘work-wives’, just wrote a book called Cook Fight. Cook Fight is not your average cookbook – it chronicles the two writers’ contrasting approaches to challenges like the Thanksgiving challenge and the Comfort challenge, just to name a few. With each challenge, the women had to feed six people for $50. Since the women come from distinctly different backgrounds – Severson learned to cook instinctively by way of her large Italian family, while Moskin learned together with her parents using cookbooks – the book has a fresh and interesting take on recipe development and menu planning. Follow this link to purchase your copy.

I also got to see, and even chat with a little bit, one of my favorite women of the food world – Rachael Ray! And on the evening before my birthday, at that. Rachael will always hold a special place in my heart and here’s why: when I was 12, I discovered the Food Network by accident and began to watch 30 Minute Meals religiously. Soon after the great discovery, I felt confident enough to tackle the kitchen by myself – I wanted to surprise my mom with dinner so that she wouldn’t have to cook after work. Rachael made cooking dinner look so easy and her recipes were so accessible, that I just couldn’t help myself. And I haven’t stopped cooking since that day. On December 6th, Rachael was a part of iBookstore’s Meet-the-Author series at the SoHo Apple Store. She was there to talk about her latest (the 21st, to be exact!) cookbook, My Year in Meals.

I was a little star stuck when she took her seat less than ten feet away from me but Rachael was as sweet, nice and approachable as I’d expected. This book is very special because it documents what Rachael actually cooked for herself, and for friends and family in the course of one whole year. The book also features cocktail recipes from her husband, and all the photography in the book is done by the pair as well. Follow this link to purchase your copy. And follow this link to watch a free podcast of the talk (note: at the 25 minute mark, I ask the first question of the Q&A portion).

Rachael Ray

Stay tuned for more posts this week, including a recipe for one of my oldest and best pasta dishes, and a recap of my birthday dinner!

Easy Asian-style vegetables for hard times.

Dearest readers: Please note that in the coming weeks, new blog posts will probably be scarce. There are about three weeks left of this semester (finals included) and if all goes well, I will be a college graduate come January. But until that day comes, I have to focus as much as possible on my schoolwork. I have so many papers due that I’ve lost count of them, and I haven’t even thought about cracking a book to study for final exams yet. I also have to start applying to big girl jobs soon and the mere idea of it is simply paralyzing.

If I survive this whole ordeal, I will re-commence blogging at full speed as soon as I can – you have my word. So please don’t forget about me and my baby (…ahem, this blog) in the meantime.

Asian sauteed vegetables

This recipe is for times when you need to eat something good, fast, and refuse to succumb to take-out.

(Yield: 4 servings)

Ingredients:

1 tbsp veg oil

1 tbsp sesame oil

8 oz baby bella mushrooms, trimmed and sliced

3 bulbs baby bok choy

1/4 c low sodium soy sauce

1 tsp corn starch

2 garlic cloves, minced

1 tbsp freshly grated ginger root

Procedure: (Cut off 1″ from the bottom of bok choy bulbs and separate leaves. Rinse and dry). In a bowl, combine soy sauce, corn starch, garlic and ginger. Stir until starch is dissolved and set aside. Heat both oils in a sauté pan or wok over high heat. Add mushrooms and cook until browned, about 3 min. Then add bok choy. Cook until wilted while continually stirring, 1-2 min. Then stir in soy sauce mixture; cook until sauce is thickened and bok choy is fork tender, about 1 min. Serve immediately; over rice, if preferred.

Creamy avocado dip

In many of our lives (mine included), avocados only make an appearance in the form of guacamole, or amongst layers of meat, cheese and lettuce in a sandwich. This isn’t fair. There is no reason why this healthy and sinfully good fruit should not get to lead as exciting a life as its distant fruit cousins.

Here’s how this dip came to be: I was in the midst of making baked coconut shrimp for the fist time and wanted to make a dipping sauce for them, not unlike this kick-ass sour cream dip for fried plantains. Then I spotted an avocado at the bottom on my fridge. It looked so sad and lonesome that I couldn’t help but grab it by the hand and say, “Come along, friend!” (Hypothetically, of course). The ingredients for this dip ended up haphazardly on my counter and I just thought, “This may work.” And it did. Clearly, it’s not that different from guacamole, but it is a small step for avocado-kind.

What happened to the shrimp, you ask? Well, I didn’t adhere to any specific recipe (as I am, unfortunately, all too prone to doing) and although they turned out very tasty, they were also kind of ugly, so I will not share that recipe with you as of yet. For more information on avocados – nutrition, storage and dissection – watch my video!

Dip may be served with: crispy shrimp or other seafood, tortilla chips, chicken tenders, crudites.

(Yield: about 1 cup)

Ingredients:

1 ripe avocado

1 tbsp lemon juice

3 tbsp sour cream

1/2-1 tsp sriracha sauce, to taste

1 tbsp chopped cilantro

Salt, to taste

Procedure: Dice avocado, place into a bowl and mash with a fork along with lemon juice until pureed. Stir in remaining ingredients. Taste and re-season if necessary. Serve immediately.

Weekend recap and a recipe for Leftover Turkey Gumbo

I hope you have all had a pleasant long weekend; or at least a pleasantly long one.
Since we don’t have many  relatives who live nearby (let alone on this side of the Atlantic), my parents usually have Thanksgiving dinner with their friends and I have it with mine. Screw my birthday or New Year’s – friendsgiving in the best day of the year, because there’s nothing like spending a whole day preparing a feast to share with my favorite people in the world. But as it turned out this year, I had a small dinner with my parents instead. My mom and I got to cook together and it was nice. I did get to see my friends later at night though, since we decided to go shopping at midnight. None of us urgently needed to buy anything but I was just curious what Black Friday would be like, since I’ve never done it before. The funny thing is that most of the stores didn’t really have special deals – they were just open at a strange time – but people were still stuffing their shopping totes and pulling plastic out of their wallets as if in preparation for the apocalypse. It’s amazing how much humans love to hoard possessions and how willingly we succumb to tricky marketing strategies.

New sweater and necklace thanks to Black Friday

The following day I had to go downtown to the passport office and submit a renewal application, where I waited on line for an hour and a half. It wasn’t the best place to hang out on a Saturday afternoon but at least Rene was there to keep me company, God bless his heart. When we finally got out, we headed straight to the Shake Shack nearby. I got to indulge in one of my favorite treats – Shake Shack’s perfectly crispy crinkle fries dipped into their silky custard. Some of you will probably think this is gross but it will only be those that haven’t tried this yet. I ordered the custard special of the day, which was called “Pumpkin pie, oh my!” – vanilla custard blended with a whole slice of pumpkin pie. Eating this completely erased my memory of the previously annoying 1.5 hrs. “Oh my!” indeed.

Later I got around to making this soup, which is another Thanksgiving tradition I have. It’s a simple recipe and it is the best way to use up leftover turkey.

(Yield: 4-6 servings)

Ingredients:

3 tbsp vegetable oil

2 tbsp flour

1 yellow onion, diced

1 large carrot, diced

1 celery stick, diced

1 green or red bell pepper, diced

1 tsp paprika

1/2 tsp poultry seasoning

1/4 tsp cayenne pepper

4.5 c turkey or chicken stock

1 c shredded turkey meat (or chicken, if made year-round)

Salt/pepper

1 c prepared white rice

Chopped scallions

Procedure: Heat a large enamel soup pot over low heat. Add oil and flour and whisk together for 2 minutes, until the roux is a light caramel color and smells nutty. Add vegetables with 1/2 tsp salt and 1/2 tsp pepper, and other seasonings. Stir with a wooden spoon and cook for about 10 min, until vegetables have softened, stirring occasionally. Then add stock, stir, cover pot tightly with a lid, increase heat to high, and bring soup to a boil. Once boiling, remove lid, turn heat down to medium-low and simmer for 15 min. Then add meat and simmer for another 15 min. (Soup should thicken slightly). Serve soup hot, topped with white rice and scallions.

How was your weekend?

Do you have any experience with Black Friday?

What Thanksgiving traditions do you have?

Guest post by Curious Cuisiniere: Recipe for cornbread sausage stuffing

Fellow food blogger Sarah, the Curious Cuisiniere (we both have a French word in our blog names!), suggested that we guest post for each other and of course I said yes. We decided to swap Thanksgiving recipes. Below is her creation. Isn’t it beautiful? Click HERE to see Sarah’s blog and follow her!

One of my top five Thanksgiving foods is definitely the stuffing. Over here, we’re used to the classic white bread and cracker herbed stuffing. Which is great, don’t get me wrong, but I had seen recipes for cornbread stuffing floating around and I was really intrigued.

You see, stuffing is all about texture.  Too mushy, and it can be gross.  Too dry, and you just have breadcrumbs.  With its grainy texture, how would adding cornbread effect the stuffing?  It was a question I just had to answer. And I sure am glad I did.

Seriously. We devoured the whole pan of this in two days. Just the two of us.

This stuffing is part white bread, part cornbread.  The white bread does a nice job holding the stuffing together and adds familiarity, while the cornbread gives incredible texture and flavor to the dish. I wanted to play off the sweet corn flavor by using sweeter, more mild veggies.  Leeks give a soft hint of onion, carrots add a nice vegetable fullness, and celery brings in the flavors of a classic stuffing.

If you like stuffing, you’ve got to try this. If you hate stuffing because it’s too mushy, you’ve got to try this too. But carefully – you just might become a stuffing convert.

Cornbread Sausage Stuffing

Yield (1) 8×8 baking dish (roughly 2 qts) (enough to stuff a 10-12lb bird)

Ingredients

1/2 lb Sweet Italian Turkey Sausage (2 sausages), casing removed  (You could use a regular Sweet Italian here, just be sure to drain the fat after cooking it)
3/4 c leek, diced
1/2 c carrot, diced very fine or minced
1/2 c celery, diced
4 c cornbread, prepared, left out to dry slightly, and crumbled into 1/2″ chunks
3 c white bread cubes (1/2″), left out out dry slightly
1 tsp thyme
1/2 tsp sage
1/4 tsp salt
1/4 tsp pepper
2 1/2 c vegetable stock
1 egg, beaten

Directions

1.  Preheat oven to 350F.

2.  In a non-stick frying pan, fry up your sausages, breaking the meat into chunks.  Remove cooked sausage from pan.

3.  In the same pan, saute leeks, carrots, and celery until tender.  Remove from heat and combine with sausage.

4.  In a large bowl, mix cornbread pieces, bread cubes, and spices.  Toss to combine.

5.  Add sausage and vegetable mixture.  Mix to combine.

6.  Add vegetable stock 1/2 c at a time, stirring to coat the bread.  Continue adding vegetable stock until the bread mixture is moist.  (There will be a notable point where the bread goes from soaking up all the stock to the stock pooling in the bottom.  Don’t worry if there is a little stock pooling in the bowl.)

7.  Mix in the beaten egg.

(If you are stuffing your bird, do so now.  Stuffing can be made ahead of time up to this point and refrigerated until you are ready to cook your bird.  It is best to stuff the bird right before it goes into the oven. )

8.  Grease an 8×8 (or other 2qt) baking dish.  Fill the dish with the stuffing and bake, uncovered, at 350F for 30 minutes.  (Check the stuffing after 20 minutes to be sure the top isn’t browning too much.  If it is, top with aluminum foil for the remainder of the baking time.)  Stuffing is done when a metal knife inserted in the center comes out hot.

Vegetable pancakes

I am currently in the last semester of my undergraduate education, and with each day, I care about schoolwork less and less. Some of you are probably thinking, “Oh no! But school is so important.” While I agree, I also believe that tending to that which makes one’s heart smile is equally as important (unless it’s killing babies/cooking drugs, in which case one should seek help). That is why on the first day of my Sandy “staycation”, I was ecstatic – no school, no work, can’t go outside, nothing to do but make love to my kitchen. Seriously, at this point, all I want to do is explore new recipes, work on my photography, choose my words, and hit “Publish”.

These pancakes are just one of the scrumptious things I made that day.

This is another one of my mom’s recipes. The outside crisps up while the inside stays delicate and soft – topped with cold sour cream, these little guys kick ass. Warning: next day fridge leftovers will not be good so I urge you to eat these fast, with which I don’t foresee you having a problem.

(Yield: about 20 little pancakes)

Ingredients:

2 medium russet potatoes, peeled

1 green squash, peeled

1 large carrot, peeled

2 garlic cloves, minced

2 eggs, beaten

1/2 c all-purpose flour

Salt + freshly ground black pepper

Vegetable oil for frying

Sour cream for serving

Procedure: Shred vegetables (preferably using a food processor).

Working with a handful of vegetables at a time, squeeze out as much liquid from vegetables as possible with your hands. Then combine vegetables with garlic, eggs and flour in a bowl. Season with 3/4 tsp salt and 1/2 tsp pepper.

Heat a skillet/griddle pan over medium heat and add enough oil to cover the bottom. When hot, spoon batter onto skillet and press down on each pancake with spoon to flatten. Pancakes should be 2-3″ in diameter.

Cook about 4 min per side, flipping once, until golden brown. Drain on paper towels. Repeat with remaining batter. Serve immediately, topped with sour cream.

What would you be doing if you didn’t have to study/work?

Lentils.

A long time ago, in a restaurant of which the name I cannot recall, in the company of enigmatic person-X from my past, I had green lentils braised in red wine as a side dish for beef. Though I may not recall other details of that day, I never forgot that side dish.

Not too long ago, I found this recipe on Christine Cooks and it’s been bookmarked ever since. It finally came in handy this week.

Lentils are a power food because of their high levels of protein, fiber and iron. They are flavorful, nutritious, and chic enough for your next dinner party.

I followed the recipe exactly, except that I halved it to make the right amount for four people.